App:Library:LVGL:docs:Get started
https://docs.lvgl.io/8.2/get-started/index.html
Quick overview
英文 自動翻訳 Here you can learn the most important things about LVGL. You should read this first to get a general impression and read the detailed Porting and Overview sections after that.
Get started in a simulator
英文 自動翻訳 Instead of porting LVGL to embedded hardware straight away, it's highly recommended to get started in a simulator first. LVGL is ported to many IDEs to be sure you will find your favorite one. Go to the Simulators section to get ready-to-use projects that can be run on your PC. This way you can save the time of porting for now and get some experience with LVGL immediately.
Add LVGL into your project
英文 自動翻訳 If you would rather try LVGL on your own project follow these steps: - Download or clone the library from GitHub with
git clone https://github.com/lvgl/lvgl.git. - Copy the
lvglfolder into your project. - Copy
lvgl/lv_conf_template.haslv_conf.hnext to thelvglfolder, change the first#if 0to1to enable the file's content and set theLV_COLOR_DEPTHdefines. - Include
lvgl/lvgl.hin files where you need to use LVGL related functions. - Call
lv_tick_inc(x)everyxmilliseconds in a Timer or Task (xshould be between 1 and 10). It is required for the internal timing of LVGL. Alternatively, configureLV_TICK_CUSTOM(seelv_conf.h) so that LVGL can retrieve the current time directly. - Call
lv_init() - Create a draw buffer: LVGL will render the graphics here first, and send the rendered image to the display. The buffer size can be set freely but 1/10 screen size is a good starting point.
static lv_disp_draw_buf_t draw_buf;
static lv_color_t buf1[DISP_HOR_RES * DISP_VER_RES / 10];                        /*Declare a buffer for 1/10 screen size*/
lv_disp_draw_buf_init(&draw_buf, buf1, NULL, MY_DISP_HOR_RES * MY_DISP_VER_SER / 10);  /*Initialize the display buffer.*/
- Implement and register a function which can copy the rendered image to an area of your display:
static lv_disp_drv_t disp_drv; /*Descriptor of a display driver*/ lv_disp_drv_init(&disp_drv); /*Basic initialization*/ disp_drv.flush_cb = my_disp_flush; /*Set your driver function*/ disp_drv.draw_buf = &draw_buf; /*Assign the buffer to the display*/ disp_drv.hor_res = MY_DISP_HOR_RES; /*Set the horizontal resolution of the display*/ disp_drv.ver_res = MY_DISP_VER_RES; /*Set the vertical resolution of the display*/ lv_disp_drv_register(&disp_drv); /*Finally register the driver*/ void my_disp_flush(lv_disp_drv_t * disp, const lv_area_t * area, lv_color_t * color_p) { int32_t x, y; /*It's a very slow but simple implementation. *`set_pixel` needs to be written by you to a set pixel on the screen*/ for(y = area->y1; y <= area->y2; y++) { for(x = area->x1; x <= area->x2; x++) { set_pixel(x, y, *color_p); color_p++; } } lv_disp_flush_ready(disp); /* Indicate you are ready with the flushing*/ }- Implement and register a function which can read an input device. E.g. for a touchpad:
static lv_indev_drv_t indev_drv; /*Descriptor of a input device driver*/ lv_indev_drv_init(&indev_drv); /*Basic initialization*/ indev_drv.type = LV_INDEV_TYPE_POINTER; /*Touch pad is a pointer-like device*/ indev_drv.read_cb = my_touchpad_read; /*Set your driver function*/ lv_indev_drv_register(&indev_drv); /*Finally register the driver*/ void my_touchpad_read(lv_indev_t * indev, lv_indev_data_t * data) { /*`touchpad_is_pressed` and `touchpad_get_xy` needs to be implemented by you*/ if(touchpad_is_pressed()) { data->state = LV_INDEV_STATE_PRESSED; touchpad_get_xy(&data->point.x, &data->point.y); } else { data->state = LV_INDEV_STATE_RELEASED; } }- Call
lv_timer_handler()periodically every few milliseconds in the mainwhile(1)loop or in an operating system task. It will redraw the screen if required, handle input devices, animation etc.
For a more detailed guide go to the Porting section.
- Download or clone the library from GitHub with
Learn the basics
英文 自動翻訳 Widgets
The graphical elements like Buttons, Labels, Sliders, Charts etc. are called objects or widgets. Go to Widgets to see the full list of available widgets.
Every object has a parent object where it is created. For example, if a label is created on a button, the button is the parent of label.
The child object moves with the parent and if the parent is deleted the children will be deleted too.
Children can be visible only within their parent's bounding area. In other words, the parts of the children outside the parent are clipped.
A Screen is the "root" parent. You can have any number of screens.
To get the current screen call
lv_scr_act(), and to load a screen uselv_scr_load(scr1).You can create a new object with
lv_<type>_create(parent). It will return anlv_obj_t *variable that can be used as a reference to the object to set its parameters.For example:
lv_obj_t * slider1 = lv_slider_create(lv_scr_act());
To set some basic attributes
lv_obj_set_<parameter_name>(obj, <value>)functions can be used. For example:lv_obj_set_x(btn1, 30); lv_obj_set_y(btn1, 10); lv_obj_set_size(btn1, 200, 50);
Along with the basic attributes, widgets can have type specific parameters which are set by
lv_<widget_type>_set_<parameter_name>(obj, <value>)functions. For example:lv_slider_set_value(slider1, 70, LV_ANIM_ON);
To see the full API visit the documentation of the widgets or the related header file (e.g. lvgl/src/widgets/lv_slider.h).
Events
Events are used to inform the user that something has happened with an object. You can assign one or more callbacks to an object which will be called if the object is clicked, released, dragged, being deleted, etc.
A callback is assigned like this:
lv_obj_add_event_cb(btn, btn_event_cb, LV_EVENT_CLICKED, NULL); /*Assign a callback to the button*/ ... void btn_event_cb(lv_event_t * e) { printf("Clicked\n"); }LV_EVENT_ALLcan be used instead ofLV_EVENT_CLICKEDto invoke the callback for any event.From
lv_event_t * ethe current event code can be retrieved with:lv_event_code_t code = lv_event_get_code(e);
The object that triggered the event can be retrieved with:
lv_obj_t * obj = lv_event_get_target(e);
To learn all features of the events go to the Event overview section.
Parts
Widgets might be built from one or more parts. For example, a button has only one part called
LV_PART_MAIN. However, a Slider hasLV_PART_MAIN,LV_PART_INDICATORandLV_PART_KNOB.By using parts you can apply different styles to sub-elements of a widget. (See below)
Read the widgets' documentation to learn which parts each uses.
States
LVGL objects can be in a combination of the following states:
LV_STATE_DEFAULTNormal, released stateLV_STATE_CHECKEDToggled or checked stateLV_STATE_FOCUSEDFocused via keypad or encoder or clicked via touchpad/mouseLV_STATE_FOCUS_KEYFocused via keypad or encoder but not via touchpad/mouseLV_STATE_EDITEDEdit by an encoderLV_STATE_HOVEREDHovered by mouse (not supported now)LV_STATE_PRESSEDBeing pressedLV_STATE_SCROLLEDBeing scrolledLV_STATE_DISABLEDDisabled
For example, if you press an object it will automatically go to the
LV_STATE_FOCUSEDandLV_STATE_PRESSEDstates and when you release it theLV_STATE_PRESSEDstate will be removed while focus remains active.To check if an object is in a given state use
lv_obj_has_state(obj, LV_STATE_...). It will returntrueif the object is currently in that state.To manually add or remove states use:
lv_obj_add_state(obj, LV_STATE_...);
lv_obj_clear_state(obj, LV_STATE_...);
123 Styles
A style instance contains properties such as background color, border width, font, etc. that describe the appearance of objects.
Styles are represented with
lv_style_tvariables. Only their pointer is saved in the objects so they need to be defined as static or global. Before using a style it needs to be initialized withlv_style_init(&style1). After that, properties can be added to configure the style. For example:static lv_style_t style1; lv_style_init(&style1); lv_style_set_bg_color(&style1, lv_color_hex(0xa03080)) lv_style_set_border_width(&style1, 2))
See the full list of properties here.
Styles are assigned using the ORed combination of an object's part and state. For example to use this style on the slider's indicator when the slider is pressed:
lv_obj_add_style(slider1, &style1, LV_PART_INDICATOR | LV_STATE_PRESSED);
If the part is
LV_PART_MAINit can be omitted:lv_obj_add_style(btn1, &style1, LV_STATE_PRESSED); /*Equal to LV_PART_MAIN | LV_STATE_PRESSED*/
Similarly,
LV_STATE_DEFAULTcan be omitted too:lv_obj_add_style(slider1, &style1, LV_PART_INDICATOR); /*Equal to LV_PART_INDICATOR | LV_STATE_DEFAULT*/
For
LV_STATE_DEFAULTandLV_PART_MAINsimply write0:lv_obj_add_style(btn1, &style1, 0); /*Equal to LV_PART_MAIN | LV_STATE_DEFAULT*/
Styles can be cascaded (similarly to CSS). It means you can add more styles to a part of an object. For example
style_btncan set a default button appearance, andstyle_btn_redcan overwrite the background color to make the button red:lv_obj_add_style(btn1, &style_btn, 0); lv_obj_add_style(btn1, &style1_btn_red, 0);
If a property is not set on for the current state, the style with
LV_STATE_DEFAULTwill be used. A default value is used if the property is not defined in the default state.Some properties (typically the text-related ones) can be inherited. This means if a property is not set in an object it will be searched for in its parents too. For example, you can set the font once in the screen's style and all text on that screen will inherit it by default.
Local style properties also can be added to objects. This creates a style which resides inside the object and is used only by the object:
lv_obj_set_style_bg_color(slider1, lv_color_hex(0x2080bb), LV_PART_INDICATOR | LV_STATE_PRESSED);
To learn all the features of styles see the Style overview section.
Themes
Themes are the default styles for objects. Styles from a theme are applied automatically when objects are created.
The theme for your application is a compile time configuration set in
lv_conf.h.
Examples
英文 自動翻訳 A button with a label and react on click event
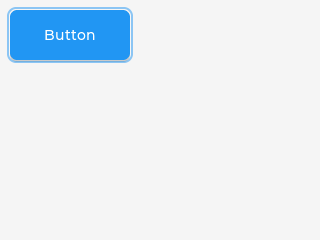
ラベルが付いたボタン クリックイベントに反応します
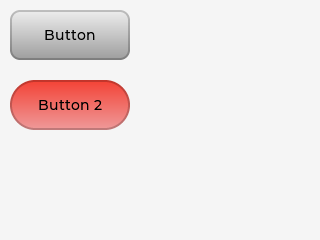
Create styles from scratch for buttons
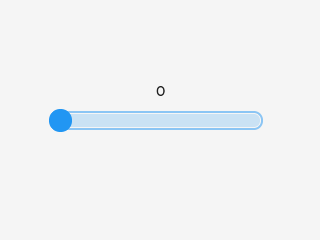
ボタンのスタイルを最初から作成する Create a slider and write its value on a label
スライダーを作成し、その値をラベルに書き込みます Micropython
Learn more about Micropython.
# Create a Button and a Label
scr = lv.obj()
btn = lv.btn(scr)
btn.align(lv.scr_act(), lv.ALIGN.CENTER, 0, 0)
label = lv.label(btn)
label.set_text("Button")

# Load the screen
lv.scr_load(scr)
Micropython Micropythonの詳細をご覧ください。