App:Library:LVGL:docs:Widgets:Base object

提供: robot-jp wiki
ナビゲーションに移動検索に移動

https://docs.lvgl.io/latest/en/html/widgets/obj.html

https://docs.lvgl.io/8.2/widgets/index.html


Base object (lv_obj)

Overview

英文 自動翻訳

The 'Base Object' implements the basic properties of widgets on a screen, such as:

  • coordinates
  • parent object
  • children
  • contains the styles
  • attributes like Clickable, Scrollable, etc.


In object-oriented thinking, it is the base class from which all other objects in LVGL are inherited.

This, among another things, helps reduce code duplication.

The functions and functionalities of Base object can be used with other widgets too. For example lv_obj_set_width(slider, 100)


The Base object can be directly used as a simple widgets. It nothing else then a rectangle.

ベースオブジェクト」は、画面上のウィジェットの基本的なプロパティを実装したもので、次のようなものです。
  • 座標
  • 親オブジェクト
  • 子供
  • スタイルが含まれています
  • ClickableScrollableなどの属性。


オブジェクト指向の考え方では、LVGL の他のすべてのオブジェクトが継承される基本クラスです。

これはコードの重複を減らすのに役立ちます。


Base オブジェクトの関数と機能は、他のウィジェットでも使用できます。 例えば lv_obj_set_width(slider, 100)


Base オブジェクトは、単純なウィジェットとして直接使用できます。 長方形に他なりません。

戻る : Previous


Coordinates

Size

英文 自動翻訳

The object size can be modified on individual axes with lv_obj_set_width(obj, new_width) and lv_obj_set_height(obj, new_height), or both axes can be modified at the same time with lv_obj_set_size(obj, new_width, new_height).


Styles can add Margin to the objects. Margin tells that "I want this space around me". To set width or height reduced by the margin lv_obj_set_width_margin(obj, new_width) or lv_obj_set_height_margin(obj, new_height). In more exact way: new_width = left_margin + object_width + right_margin.


To get the width or height which includes the margins use lv_obj_get_width/height_margin(obj).


Styles can add Padding to the object as well. Padding means "I don't want my children too close to my sides, so keep this space".

To set width or height reduced by the padding lv_obj_set_width_fit(obj, new_width) or lv_obj_set_height_fit(obj, new_height).

In a more exact way: new_width = left_pad + object_width + right_pad

To get the width or height which is REDUCED by padding use lv_obj_get_width/height_fit(obj).

It can be considered the "useful size of the object".


Margin and padding gets important when Layout or Auto-fit is used by other widgets.

オブジェクトのサイズは、lv_obj_set_width(obj, new_width)およびlv_obj_set_height(obj, new_height)を使用して個々の軸上で変更することも、lv_obj_set_size(obj, new_width, new_height)を使用して両方の軸を同時に変更することもできます。


スタイルは、オブジェクトに余白を追加できます。 マージンは「自分の周りにこのスペースが欲しい」と語っています。 マージン lv_obj_set_width_margin(obj, new_width)または lv_obj_set_height_margin(obj, new_height) だけ縮小された幅または高さを設定します。 より正確には、new_width = left_margin + object_width + right_margin です。


マージンを含む幅または高さを取得するには、lv_obj_get_width/height_margin(obj)を使用します。


スタイルは、オブジェクトにパディングを追加することもできます。 パディングとは、「子供たちを脇に近づけたくないので、このスペースを確保してください」という意味です。

パディング lv_obj_set_width_fit(obj, new_width) または lv_obj_set_height_fit(obj, new_height)によって縮小された幅または高さを設定します。

より正確な方法: new_width = left_pad + object_width + right_pad

パディングによって削減された幅または高さを取得するには、lv_obj_get_width/height_fit(obj)を使用します。

これは「オブジェクトの有用なサイズ」と見なすことができます。


レイアウトまたは自動調整が他のウィジェットで使用されている場合、マージンとパディングが重要になります。

戻る : Previous


Position

英文 自動翻訳

You can set the position relative to the parent with lv_obj_set_x(obj, new_x) and lv_obj_set_y(obj, new_y), or both axes at the same time with lv_obj_set_pos(obj, new_x, new_y).

親からの相対位置は、lv_obj_set_x(obj, new_x)lv_obj_set_y(obj, new_y)、またはlv_obj_set_pos(obj, new_x, new_y)を使用して同時に設定できます。
戻る : Previous


Alignment

英文 自動翻訳
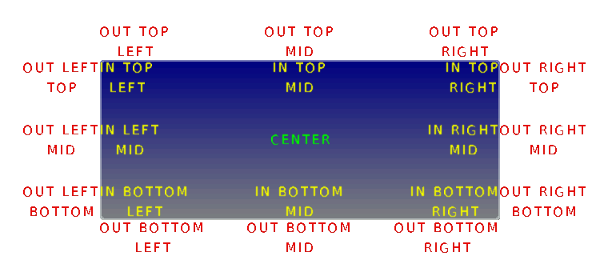
You can align the object to another with lv_obj_align(obj, obj_ref, LV_ALIGN_..., x_ofs, y_ofs).
  • obj is the object to align.
  • obj_ref is a reference object. obj will be aligned to it. If obj_ref = NULL, then the parent of obj will be used.
  • The third argument is the type of alignment. These are the possible options:
lv_obj_align(obj, obj_ref, LV_ALIGN_..., x_ofs, y_ofs) を使用して、オブジェクトを別のオブジェクトに位置合わせできます。
  • obj は整列するオブジェクトです。
  • obj_ref は参照オブジェクトです。 obj がそれに合わせられます。 obj_ref = NULL の場合、obj の親が使用されます。
  • 3 番目の引数は、配置のタイプです。 可能なオプションは次のとおりです。
LVGL Lib docs obj.png
  • The alignment types build like LV_ALIGN_OUT_TOP_MID.
  • The last two arguments allow you to shift the object by a specified number of pixels after aligning it.
  • 配置タイプは LV_ALIGN_OUT_TOP_MID のように構築されます。
  • 最後の 2 つの引数を使用すると、位置合わせ後に、指定したピクセル数だけオブジェクトをシフトできます。
For example, to align a text below an image: lv_obj_align(text, image, LV_ALIGN_OUT_BOTTOM_MID, 0, 10).

Or to align a text in the middle of its parent: lv_obj_align(text, NULL, LV_ALIGN_CENTER, 0, 0).


lv_obj_align_origo works similarly to lv_obj_align but it aligns the center of the object.


For example, lv_obj_align_origo(btn, image, LV_ALIGN_OUT_BOTTOM_MID, 0, 0) will align the center of the button the bottom of the image.


The parameters of the alignment will be saved in the object if LV_USE_OBJ_REALIGN is enabled in lv_conf.h.

You can then realign the objects simply by calling lv_obj_realign(obj).

It's equivalent to calling lv_obj_align again with the same parameters.

たとえば、画像の下にテキストを配置するには: lv_obj_align(text, image, LV_ALIGN_OUT_BOTTOM_MID, 0, 10)

または、テキストをその親の中央に配置するには: lv_obj_align(text, NULL, LV_ALIGN_CENTER, 0, 0)


lv_obj_align_origolv_obj_align と同様に機能しますが、オブジェクトの中心を揃えます。


たとえば、lv_obj_align_origo(btn, image, LV_ALIGN_OUT_BOTTOM_MID, 0, 0) は、ボタンの中心を画像の下に揃えます。


LV_USE_OBJ_REALIGNlv_conf.h で有効になっている場合、アラインメントのパラメーターはオブジェクトに保存されます。

その後、lv_obj_realign(obj) を呼び出すだけでオブジェクトを再配置できます。

同じパラメーターで lv_obj_align を再度呼び出すことと同じです。

If the alignment happened with lv_obj_align_origo, then it will be used when the object is realigned.


The lv_obj_align_x/y and lv_obj_align_origo_x/y function can be used t align only on one axis.


If lv_obj_set_auto_realign(obj, true) is used the object will be realigned automatically, if its size changes in lv_obj_set_width/height/size() functions. It's very useful when size animations are applied to the object and the original position needs to be kept.


Note that the coordinates of screens can't be changed. Attempting to use these functions on screens will result in undefined behavior.

アライメントが lv_obj_align_origo で発生した場合、オブジェクトが再アライメントされるときに使用されます。


lv_obj_align_x/y および lv_obj_align_origo_x/y関数は、1 つの軸でのみ整列するために使用できます。


lv_obj_set_auto_realign(obj, true) が使用されている場合、そのサイズが lv_obj_set_width/height/size() 関数で変更された場合、オブジェクトは自動的に再配置されます。 オブジェクトにサイズ アニメーションを適用し、元の位置を維持する必要がある場合に非常に便利です。


画面の座標は変更できないことに注意してください。 これらの関数を画面で使用しようとすると、未定義の動作が発生します。

戻る : Previous


Parents and children

英文 自動翻訳
You can set a new parent for an object with lv_obj_set_parent(obj, new_parent).

To get the current parent, use lv_obj_get_parent(obj).

To get the children of an object, use lv_obj_get_child(obj, child_prev) (from last to first) or lv_obj_get_child_back(obj, child_prev) (from first to last). To get the first child, pass NULL as the second parameter and use the return value to iterate through the children. The function will return NULL if there are no more children. For example:

lv_obj_set_parent(obj, new_parent)を使用して、オブジェクトの新しい親を設定できます。

現在の親を取得するには、lv_obj_get_parent(obj) を使用します。


オブジェクトの子を取得するには、llv_obj_get_child(obj, child_prev) (最後から最初へ) または lv_obj_get_child_back(obj, child_prev) (最初から最後へ) を使用します。 最初の子を取得するには、2 番目のパラメーターとして NULL を渡し、戻り値を使用して子を反復処理します。 子がそれ以上ない場合、関数は NULL を返します。 例えば:

lv_obj_t * child = lv_obj_get_child(parent, NULL);
while(child) {
    /*Do something with "child" */
    child = lv_obj_get_child(parent, child);
}
lv_obj_get_index(obj) tells the number of children on an object.

It is equivalent to the number of younger children in the parent.


lv_obj_count_children_recursive(obj) also tells the number of children but counts children of children recursively.

lv_obj_get_index(obj) は、オブジェクトの子の数を示します。

これは、親の年少の子供の数に相当します。


lv_obj_count_children_recursive(obj) も子の数を示しますが、子の子を再帰的にカウントします。

戻る : Previous


Screens

英文 自動翻訳

When you have created a screen like lv_obj_t * screen = lv_obj_create(NULL, NULL), you can load it with lv_scr_load(screen).

The lv_scr_act() function gives you a pointer to the current screen.


If you have more display then it's important to know that these functions operate on the lastly created or the explicitly selected (with lv_disp_set_default) display.


To get an object's screen use the lv_obj_get_screen(obj) function.

lv_obj_t * screen = lv_obj_create(NULL, NULL)のように画面を作成したら、lv_scr_load(screen) で読み込むことができます。

lv_scr_act()関数は、現在の画面へのポインターを提供します。


より多くのディスプレイがある場合、これらの関数は最後に作成されたディスプレイまたは明示的に選択された (lv_disp_set_defaultを使用して) ディスプレイで動作することを知っておくことが重要です。


オブジェクトの画面を取得するには、lv_obj_get_screen(obj)関数を使用します。

戻る : Previous


Layers

英文 自動翻訳

There are two automatically generated layers:

  • top layer
  • system layer


They are independent of the screens and they will be shown on every screen.

The top layer is above every object on the screen and the system layer is above the top layer too. You can add any pop-up windows to the top layer freely.

But, the system layer is restricted to system-level things (e.g. mouse cursor will be placed here in lv_indev_set_cursor()).


The lv_layer_top() and lv_layer_sys() functions gives a pointer to the top or system layer.


You can bring an object to the foreground or send it to the background with lv_obj_move_foreground(obj) and lv_obj_move_background(obj).


Read the Layer overview section to learn more about layers.

2 つの自動生成レイヤーがあります。
  • 上層
  • システム層


それらは画面から独立しており、すべての画面に表示されます。 最上位レイヤーは画面上のすべてのオブジェクトの上にあり、システム レイヤーも最上位レイヤーの上にあります。

最上層に任意のポップアップ ウィンドウを自由に追加できます。

ただし、システム レイヤーはシステム レベルのものに制限されます (たとえば、マウス カーソルは lv_indev_set_cursor() でここに配置されます)。


lv_layer_top() およびlv_layer_sys()関数は、最上位層またはシステム層へのポインターを提供します。


lv_obj_move_foreground(obj)lv_obj_move_background(obj)を使用して、オブジェクトをフォアグラウンドに移動したり、バックグラウンドに移動したりできます。


layersの詳細については、レイヤーの概要セクションを参照してください。

戻る : Previous


Events

英文 自動翻訳

To set an event callback for an object, use lv_obj_add_event_cb(obj, event_cb, LV_EVENT_..., user_data),


To manually send an event to an object, use lv_event_send(obj, LV_EVENT_..., param)

Read the Event overview to learn more about events.

オブジェクトにイベントコールバックを設定するには、lv_obj_add_event_cb(obj, event_cb, LV_EVENT_..., user_data)を使い、

イベントを手動でオブジェクトに送信するには、lv_event_send(obj, LV_EVENT_..., param)を使います。

イベントの詳細については、 「イベントの概要」 を参照してください。

戻る : Previous


Parts

英文 自動翻訳
To set an event callback for an object, use lv_obj_set_event_cb(obj, event_cb),


To manually send an event to an object, use lv_event_send(obj, LV_EVENT_..., data)


Read the Event overview to learn more about the events.

オブジェクトのイベント コールバックを設定するには、lv_obj_set_event_cb(obj, event_cb)を使用します。


イベントをオブジェクトに手動で送信するには、lv_event_send(obj, LV_EVENT_..., data) を使用します。


イベントの詳細については、イベントの概要をご覧ください。

戻る : Previous

States

英文 自動翻訳
The widgets can have multiple parts. For example a Button has only a main part but a Slider is built from a background, an indicator and a knob.


The name of the parts is constructed like LV_ + <TYPE> _PART_ <NAME>. For example LV_BTN_PART_MAIN or LV_SLIDER_PART_KNOB. The parts are usually used when styles are add to the objects. Using parts different styles can be assigned to the different parts of the objects.


To learn more about the parts read the related section of the Style overview.

ウィジェットには複数のパーツを含めることができます。 たとえば、ボタンには主要な部分しかありませんが、スライダーは背景、インジケーター、およびノブから構築されます。


パーツの名前は、LV_ + <TYPE> _PART_ <NAME>のように構成されます。 たとえば、LV_BTN_PART_MAIN または LV_SLIDER_PART_KNOB です。 パーツは通常、オブジェクトにスタイルを追加するときに使用されます。 パーツを使用すると、オブジェクトのさまざまなパーツにさまざまなスタイルを割り当てることができます。


パーツの詳細については、スタイルの概要の関連セクションをお読みください。

戻る : Previous


Styles

英文 自動翻訳

Be sure to read the Style overview first.


To add a style to an object use lv_obj_add_style(obj, part, &new_style) function.

The Base object use all the rectangle-like style properties.


To remove all styles from an object use lv_obj_reset_style_list(obj, part)


If you modify a style, which is already used by objects, in order to refresh the affected objects you can use either lv_obj_refresh_style(obj) on each object using it or to notify all objects with a given style use lv_obj_report_style_mod(&style).

If the parameter of lv_obj_report_style_mod is NULL, all objects will be notified.

最初に必ずスタイルの概要をお読みください。


オブジェクトにスタイルを追加するには、lv_obj_add_style(obj, part, &new_style) 関数を使用します。

Base オブジェクトは、すべての長方形のようなスタイル プロパティを使用します。


オブジェクトからすべてのスタイルを削除するには、lv_obj_reset_style_list(obj, part)を使用します


オブジェクトで既に使用されているスタイルを変更する場合、影響を受けるオブジェクトを更新するには、それを使用する各オブジェクトで lv_obj_refresh_style(obj) を使用するか、指定されたスタイルを持つすべてのオブジェクトに lv_obj_report_style_mod(&style)を使用して通知します。 lv_obj_report_style_modのパラメーターが NULL の場合、すべてのオブジェクトが通知されます。

戻る : Previous


Attributes

英文 自動翻訳
There are some attributes which can be enabled/disabled by lv_obj_set_...(obj, true/false):
  • hidden - Hide the object. It will not be drawn and will be considered by input devices as if it doesn't exist., Its children will be hidden too.
  • click - Allows you to click the object via input devices. If disabled, then click events are passed to the object behind this one. (E.g. Labels are not clickable by default)
  • top - If enabled then when this object or any of its children is clicked then this object comes to the foreground.
  • drag - Enable dragging (moving by an input device)
  • drag_dir - Enable dragging only in specific directions. Can be LV_DRAG_DIR_HOR/VER/ALL.
  • drag_throw - Enable "throwing" with dragging as if the object would have momentum
  • drag_parent - If enabled then the object's parent will be moved during dragging. It will look like as if the parent is dragged. Checked recursively, so can propagate to grandparents too.
  • parent_event - Propagate the events to the parents too. Checked recursively, so can propagate to grandparents too.
  • opa_scale_enable - Enable opacity scaling. See the [#opa-scale](Opa scale) section.
lv_obj_set_...(obj, true/false)で有効/無効にできる属性がいくつかあります:
  • hidden - オブジェクトを隠します。それは描画されず、入力デバイスによって存在しないかのように見なされます。その子も非表示になります。
  • click - 入力デバイスを介してオブジェクトをクリックできるようにします。無効にすると、クリック イベントはこのオブジェクトの背後にあるオブジェクトに渡されます。 (例: ラベルはデフォルトではクリックできません)
  • top - 有効にすると、このオブジェクトまたはその子のいずれかをクリックすると、このオブジェクトが前面に表示されます。
  • drag - ドラッグを有効にする (入力デバイスによる移動)
  • drag_dir - 特定の方向へのドラッグのみを有効にします。 LV_DRAG_DIR_HOR/VER/ALLを指定できます。
  • drag_throw - オブジェクトに勢いがあるかのように、ドラッグで「投げ」を有効にします
  • drag_parent - 有効にすると、ドラッグ中にオブジェクトの親が移動します。親がドラッグされているように見えます。再帰的にチェックされるため、祖父母にも伝播できます。
  • parent_event - イベントを親にも伝播します。再帰的にチェックされるため、祖父母にも伝播できます。
  • opa_scale_enable - 不透明度のスケーリングを有効にします。 [#opa-scale](オパ スケール) セクションを参照してください。
戻る : Previous


Protect

英文 自動翻訳
There are some specific actions which happen automatically in the library.

To prevent one or more that kind of actions, you can protect the object against them.

The following protections exists:

  • LV_PROTECT_NONE No protection
  • LV_PROTECT_POS Prevent automatic positioning (e.g. Layout in Containers)
  • LV_PROTECT_FOLLOW Prevent the object be followed (make a "line break") in automatic ordering (e.g. Layout in Containers)
  • LV_PROTECT_PARENT Prevent automatic parent change. (e.g. Page moves the children created on the background to the scrollable)
  • LV_PROTECT_PRESS_LOST Prevent losing press when the press is slid out of the objects. (E.g. a Button can be released out of it if it was being pressed)
  • LV_PROTECT_CLICK_FOCUS Prevent automatically focusing the object if it's in a Group and click focus is enabled.
  • LV_PROTECT_CHILD_CHG Disable the child change signal. Used internally by the library


The lv_obj_add/clear_protect(obj, LV_PROTECT_...) sets/clears the protection. You can use 'OR'ed values of protection types too.

ライブラリで自動的に発生する特定のアクションがいくつかあります。

そのようなアクションを 1 つ以上防止するために、オブジェクトをそれらから保護することができます。

次の保護が存在します。

  • LV_PROTECT_NONE 保護なし
  • LV_PROTECT_POS 自動配置を防止します (例: コンテナー内のレイアウト)
  • LV_PROTECT_FOLLOW 自動順序付け (例: コンテナー内のレイアウト) でオブジェクトが続く (「改行」を行う) のを防ぎます。
  • LV_PROTECT_PARENT 自動親変更を防ぎます。 (例: Page は、背景に作成された子をスクロール可能に移動します)
  • LV_PROTECT_PRESS_LOST プレスがオブジェクトからスライドしたときにプレスが失われるのを防ぎます。 (たとえば、ボタンが押されていた場合、ボタンを離すことができます)
  • LV_PROTECT_CLICK_FOCUS オブジェクトがグループ内にあり、クリック フォーカスが有効になっている場合、オブジェクトが自動的にフォーカスされるのを防ぎます。
  • LV_PROTECT_CHILD_CHG 子変更信号を無効にします。ライブラリによって内部的に使用されます


lv_obj_add/clear_protect(obj, LV_PROTECT_...) は、保護を設定/クリアします。保護タイプの「OR」値も使用できます。

戻る : Previous


Groups

英文 自動翻訳

Once, an object is added to group with lv_group_add_obj(group, obj) the object's current group can be get with lv_obj_get_group(obj).


lv_obj_is_focused(obj) tells if the object is currently focused on its group or not. If the object is not added to a group, false will be returned.


Read the Input devices overview to learn more about the Groups.

オブジェクトが lv_group_add_obj(group, obj)でグループに追加されると、オブジェクトの現在のグループは lv_obj_get_group(obj) で取得できます。


lv_obj_is_focused(obj)は、オブジェクトが現在そのグループにフォーカスされているかどうかを示します。 オブジェクトがグループに追加されていない場合は、false が返されます。


グループの詳細については、入力デバイスの概要をご覧ください。

戻る : Previous


Extended click area

英文 自動翻訳

By default, the objects can be clicked only on their coordinates, however, this area can be extended with lv_obj_set_ext_click_area(obj, left, right, top, bottom).

left/right/top/bottom describes how far the clickable area should extend past the default in each direction.


This feature needs to enabled in lv_conf.h with LV_USE_EXT_CLICK_AREA.

The possible values are:

  • LV_EXT_CLICK_AREA_FULL store all 4 coordinates as lv_coord_t
  • LV_EXT_CLICK_AREA_TINY store only horizontal and vertical coordinates (use the greater value of left/right and top/bottom) as uint8_t
  • LV_EXT_CLICK_AREA_OFF Disable this feature
デフォルトでは、オブジェクトは座標上でのみクリックできますが、この領域はv_obj_set_ext_click_area(obj, left, right, top, bottom)で拡張できます。

left/right/top/bottomは、クリック可能な領域がデフォルトを超えて各方向にどれだけ拡張されるかを示します。


この機能は、LV_USE_EXT_CLICK_AREA を使用して lv_conf.h で有効にする必要があります。

可能な値は次のとおりです。

  • LV_EXT_CLICK_AREA_FULL 4 つの座標すべてを lv_coord_t として保存します
  • LV_EXT_CLICK_AREA_TINY は、uint8_t として水平および垂直座標のみを格納します (左/右および上/下の大きい方の値を使用)。
  • LV_EXT_CLICK_AREA_OFF この機能を無効にする
戻る : Previous


Events

英文 自動翻訳
Only the Generic events are sent by the object type.


Learn more about Events.

オブジェクト タイプによって送信されるのは Generic events のみです。

詳細はEventsをご覧ください。

戻る : Previous


Keys

英文 自動翻訳

No Keys are processed by the object type.


Learn more about Keys.

オブジェクト タイプによって処理されるキーはありません。


詳細はKeysをご覧ください。

戻る : Previous


Example

Base objects with custom styles

LVGL Lib docs BaseObj.png
戻る : Previous

API

戻る : Previous