「App:Library:LVGL:docs:Overview:Positions, sizes, and layouts」の版間の差分
| (同じ利用者による、間の3版が非表示) | |||
| 28行目: | 28行目: | ||
* フレックスボックスとグリッドレイアウトのサブセットをサポートしています。 | * フレックスボックスとグリッドレイアウトのサブセットをサポートしています。 | ||
|} | |} | ||
| − | :[[App:Library:LVGL:docs:Overview|戻る : Previous]] | + | :[[App:Library:LVGL:docs:Overview#Positions,%20sizes,%20and%20layouts|戻る : Previous]] |
| 45行目: | 45行目: | ||
*<code style="color: #bb0000;">LV_SIZE_CONTENT</code>: オブジェクトの幅/高さを設定するための特別な値で、すべての子オブジェクトを巻き込みます。CSSのautoに似ている。例: <code style="color: #bb0000;">lv_obj_set_width(btn, LV_SIZE_CONTENT)</code>. | *<code style="color: #bb0000;">LV_SIZE_CONTENT</code>: オブジェクトの幅/高さを設定するための特別な値で、すべての子オブジェクトを巻き込みます。CSSのautoに似ている。例: <code style="color: #bb0000;">lv_obj_set_width(btn, LV_SIZE_CONTENT)</code>. | ||
|} | |} | ||
| − | :[[App:Library:LVGL# | + | :[[App:Library:LVGL:docs:Overview#Positions,%20sizes,%20and%20layouts|戻る : Previous]] |
| 81行目: | 81行目: | ||
アウトラインはバウンディングボックスの外側に描画されます。 | アウトラインはバウンディングボックスの外側に描画されます。 | ||
|} | |} | ||
| − | :[[App:Library:LVGL# | + | :[[App:Library:LVGL:docs:Overview#Positions,%20sizes,%20and%20layouts|戻る : Previous]] |
=== Important notes === | === Important notes === | ||
| 92行目: | 92行目: | ||
|ここでは、LVGLの動作が予期しない可能性のある特殊なケースについて説明します。 | |ここでは、LVGLの動作が予期しない可能性のある特殊なケースについて説明します。 | ||
|} | |} | ||
| − | :[[App:Library:LVGL# | + | :[[App:Library:LVGL:docs:Overview#Positions,%20sizes,%20and%20layouts|戻る : Previous]] |
| 112行目: | 112行目: | ||
サイズと位置は、親やレイアウトに依存するかもしれません。したがって、<code style="color: #bb0000;">lv_obj_update_layout</code> は <code style="color: #bb0000;">obj</code>の画面上のすべてのオブジェクトの座標を再計算します。 | サイズと位置は、親やレイアウトに依存するかもしれません。したがって、<code style="color: #bb0000;">lv_obj_update_layout</code> は <code style="color: #bb0000;">obj</code>の画面上のすべてのオブジェクトの座標を再計算します。 | ||
|} | |} | ||
| − | :[[App:Library:LVGL# | + | :[[App:Library:LVGL:docs:Overview#Positions,%20sizes,%20and%20layouts|戻る : Previous]] |
| 167行目: | 167行目: | ||
</syntaxhighlight> | </syntaxhighlight> | ||
|} | |} | ||
| − | :[[App:Library:LVGL# | + | :[[App:Library:LVGL:docs:Overview#Positions,%20sizes,%20and%20layouts|戻る : Previous]] |
| − | |||
== Position == | == Position == | ||
| 202行目: | 201行目: | ||
</syntaxhighlight> | </syntaxhighlight> | ||
|} | |} | ||
| − | :[[App:Library:LVGL# | + | :[[App:Library:LVGL:docs:Overview#Positions,%20sizes,%20and%20layouts|戻る : Previous]] |
| 318行目: | 317行目: | ||
</syntaxhighlight> | </syntaxhighlight> | ||
|} | |} | ||
| − | :[[App:Library:LVGL# | + | :[[App:Library:LVGL:docs:Overview#Positions,%20sizes,%20and%20layouts|戻る : Previous]] |
| 397行目: | 396行目: | ||
</syntaxhighlight> | </syntaxhighlight> | ||
|} | |} | ||
| − | :[[App:Library:LVGL# | + | :[[App:Library:LVGL:docs:Overview#Positions,%20sizes,%20and%20layouts|戻る : Previous]] |
| 446行目: | 445行目: | ||
後述するように、サイズと位置の設定には、他にも素晴らしい機能があります。しかし、LVGL APIを無駄なく使うために、最も一般的な座標設定機能のみ「シンプル」バージョンを用意し、より複雑な機能はスタイルを介して使用できるようにしました。 | 後述するように、サイズと位置の設定には、他にも素晴らしい機能があります。しかし、LVGL APIを無駄なく使うために、最も一般的な座標設定機能のみ「シンプル」バージョンを用意し、より複雑な機能はスタイルを介して使用できるようにしました。 | ||
|} | |} | ||
| − | :[[App:Library:LVGL# | + | :[[App:Library:LVGL:docs:Overview#Positions,%20sizes,%20and%20layouts|戻る : Previous]] |
| 618行目: | 617行目: | ||
</syntaxhighlight> | </syntaxhighlight> | ||
|} | |} | ||
| − | :[[App:Library:LVGL# | + | :[[App:Library:LVGL:docs:Overview#Positions,%20sizes,%20and%20layouts|戻る : Previous]] |
| 671行目: | 670行目: | ||
</syntaxhighlight> | </syntaxhighlight> | ||
|} | |} | ||
| − | :[[App:Library:LVGL# | + | :[[App:Library:LVGL:docs:Overview#Positions,%20sizes,%20and%20layouts|戻る : Previous]] |
| 698行目: | 697行目: | ||
どのレイアウトでも同じ関数が1つだけあります: <code style="color: #bb0000;">lv_obj_set_layout(obj, <LAYOUT_NAME>)</code> は、オブジェクトにレイアウトを設定します。親と子のさらなる設定については、指定されたレイアウトのドキュメントを参照してください。 | どのレイアウトでも同じ関数が1つだけあります: <code style="color: #bb0000;">lv_obj_set_layout(obj, <LAYOUT_NAME>)</code> は、オブジェクトにレイアウトを設定します。親と子のさらなる設定については、指定されたレイアウトのドキュメントを参照してください。 | ||
|} | |} | ||
| − | :[[App:Library:LVGL# | + | :[[App:Library:LVGL:docs:Overview#Positions,%20sizes,%20and%20layouts|戻る : Previous]] |
| 720行目: | 719行目: | ||
どちらも、同じ名前のCSSレイアウトに大きく触発されています。 | どちらも、同じ名前のCSSレイアウトに大きく触発されています。 | ||
|} | |} | ||
| − | :[[App:Library:LVGL# | + | :[[App:Library:LVGL:docs:Overview#Positions,%20sizes,%20and%20layouts|戻る : Previous]] |
| 744行目: | 743行目: | ||
これらのフラグは<code style="color: #bb0000;">lv_obj_add/clear_flag(obj, FLAG);</code>で追加/削除することができます。 | これらのフラグは<code style="color: #bb0000;">lv_obj_add/clear_flag(obj, FLAG);</code>で追加/削除することができます。 | ||
|} | |} | ||
| − | :[[App:Library:LVGL# | + | :[[App:Library:LVGL:docs:Overview#Positions,%20sizes,%20and%20layouts|戻る : Previous]] |
| 816行目: | 815行目: | ||
</syntaxhighlight> | </syntaxhighlight> | ||
|} | |} | ||
| − | :[[App:Library:LVGL# | + | :[[App:Library:LVGL:docs:Overview#Positions,%20sizes,%20and%20layouts|戻る : Previous]] |
2022年7月2日 (土) 10:10時点における最新版
https://docs.lvgl.io/8.2/overview/coords.html
Positions, sizes, and layouts
Overview
| 英文 | 自動翻訳 |
|---|---|
|
Similarly to many other parts of LVGL, the concept of setting the coordinates was inspired by CSS. LVGL has by no means a complete implementation of CSS but a comparable subset is implemented (sometimes with minor adjustments). In short this means:
|
LVGLの他の多くの部分と同様に、座標の設定のコンセプトはCSSからヒントを得たものです。LVGLは決してCSSを完全に実装しているわけではありませんが、同等のサブセットを実装しています(時には細かい調整を加えています)。
要するにこれは
|
Units
| 英文 | 自動翻訳 |
|---|---|
|
|
Boxing model
| 英文 | 自動翻訳 |
|---|---|
|
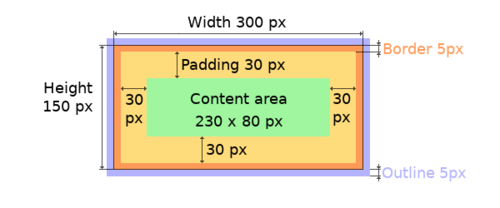
LVGL follows CSS's border-box model. An object's "box" is built from the following parts:
The outline is drawn outside the bounding box. |
LVGLはCSSのborder-boxモデルに従っています。オブジェクトの "box "は、以下のパーツから構成されます。
(絵)
アウトラインはバウンディングボックスの外側に描画されます。 |
Important notes
| 英文 | 自動翻訳 |
|---|---|
|
This section describes special cases in which LVGL's behavior might be unexpected. |
ここでは、LVGLの動作が予期しない可能性のある特殊なケースについて説明します。 |
Postponed coordinate calculation
| 英文 | 自動翻訳 |
|---|---|
|
LVGL doesn't recalculate all the coordinate changes immediately. This is done to improve performance. Instead, the objects are marked as "dirty" and before redrawing the screen LVGL checks if there are any "dirty" objects. If so it refreshes their position, size and layout. In other words, if you need to get the coordinate of an object and the coordinates were just changed, LVGL needs to be forced to recalculate the coordinates. To do this call The size and position might depend on the parent or layout. Therefore |
LVGL はすべての座標の変更を即座に再計算しない。これは性能を向上させるために行われます。その代わり、オブジェクトは「ダーティ」としてマークされ、画面を再描画する前にLVGLは「ダーティ」なオブジェクトがあるかどうかをチェックします。もしあれば、その位置、サイズ、レイアウトをリフレッシュします。
言い換えれば、オブジェクトの座標を得る必要があり、座標がちょうど変更された場合、LVGLは座標を再計算するように強制する必要があるのです。これを行うには、 サイズと位置は、親やレイアウトに依存するかもしれません。したがって、 |
Removing styles
| 英文 | 自動翻訳 |
|---|---|
|
As it's described in the Using styles section, coordinates can also be set via style properties. To be more precise, under the hood every style coordinate related property is stored as a style property. If you use removed by
lv_obj_remove_style_all(obj)
or lv_obj_remove_style(obj, NULL, LV_PART_MAIN);
the earlier set coordinates will be removed as well. For example: /*The size of obj1 will be set back to the default in the end*/
lv_obj_set_size(obj1, 200, 100); /*Now obj1 has 200;100 size*/
lv_obj_remove_style_all(obj1); /*It removes the set sizes*/
/*obj2 will have 200;100 size in the end */
lv_obj_remove_style_all(obj2);
lv_obj_set_size(obj2, 200, 100);
|
スタイルの使用」のセクションで説明したように、座標はスタイル プロパティによって設定することもできます。より正確には、フードの下では、スタイル座標に関連するすべてのプロパティはスタイル プロパティとして保存されます。lv_obj_set_x(obj, 20) を使用すると、LVGLはオブジェクトのローカルスタイルに x=20を保存します。
これは内部的なメカニズムで、LVGLを使う上ではあまり重要ではありません。しかし、1つだけ、この実装に注意する必要があるケースがあります。もし、あるオブジェクトのスタイル(複数可)が removed by
lv_obj_remove_style_all(obj)
または lv_obj_remove_style(obj, NULL, LV_PART_MAIN);
の場合、先に設定した座標も削除されます。 例えば /*The size of obj1 will be set back to the default in the end*/
lv_obj_set_size(obj1, 200, 100); /*Now obj1 has 200;100 size*/
lv_obj_remove_style_all(obj1); /*It removes the set sizes*/
/*obj2 will have 200;100 size in the end */
lv_obj_remove_style_all(obj2);
lv_obj_set_size(obj2, 200, 100);
|
Position
Simple way
| 英文 | 自動翻訳 |
|---|---|
|
To simply set the x and y coordinates of an object use: lv_obj_set_x(obj, 10); //Separate...
lv_obj_set_y(obj, 20);
lv_obj_set_pos(obj, 10, 20); //Or in one function
By default, the x and y coordinates are measured from the top left corner of the parent's content area. For example if the parent has five pixels of padding on every side the above code will place Percentage values are calculated from the parent's content area size. lv_obj_set_x(btn, lv_pct(10)); //x = 10 % of parent content area width
|
オブジェクトのx、y座標を単純に設定するには、次のようにします。
 lv_obj_set_x(obj, 10);        //Separate...
 lv_obj_set_y(obj, 20);
 lv_obj_set_pos(obj, 10, 20); 	//Or in one function
デフォルトでは、x と y の座標は親のコンテントエリアの左上隅から測られます。例えば、親が5ピクセルのパディングを四方に持っている場合、上のコードは パーセンテージの値は、親のコンテントエリアのサイズから計算されます。 lv_obj_set_x(btn, lv_pct(10)); //x = 10 % of parent content area width
|
Align
| 英文 | 自動翻訳 |
|---|---|
|
In some cases it's convenient to change the origin of the positioning from the default top left. If the origin is changed e.g. to bottom-right, the (0,0) position means: align to the bottom-right corner. To change the origin use: lv_obj_set_align(obj, align);
To change the alignment and set new coordinates: lv_obj_align(obj, align, x, y);
The following alignment options can be used:
It's quite common to align a child to the center of its parent, therefore a dedicated function exists: lv_obj_center(obj);
//Has the same effect
lv_obj_align(obj, LV_ALIGN_CENTER, 0, 0);
If the parent's size changes, the set alignment and position of the children is updated automatically. The functions introduced above align the object to its parent. However, it's also possible to align an object to an arbitrary reference object. lv_obj_align_to(obj_to_align, reference_obj, align, x, y); Besides the alignments options above, the following can be used to align an object outside the reference object:
For example to align a label above a button and center the label horizontally: lv_obj_align_to(label, btn, LV_ALIGN_OUT_TOP_MID, 0, -10);
lv_obj_align(), lv_obj_align_to() can not realign the object if its coordinates or the reference object's coordinates change.
|
場合によっては、位置決めの原点をデフォルトの左上から変更すると便利なことがあります。例えば、原点を右下に変更した場合、(0,0)の位置は「右下隅に揃える」という意味になります。原点を変更するには、次のようにします。
lv_obj_set_align(obj, align);
アライメントを変更し、新しい座標を設定する場合。 lv_obj_align(obj, align, x, y);
以下のアライメントオプションが使用可能です。
子を親の中心に揃えることはよくあることなので、専用の関数が存在します。 lv_obj_center(obj);
//Has the same effect
lv_obj_align(obj, LV_ALIGN_CENTER, 0, 0);
親のサイズが変わると、設定されている子供の位置や配置が自動的に更新される。 上で紹介した関数は、オブジェクトをその親に整列させるものである。しかし、オブジェクトを任意の参照オブジェクトに整列させることも可能である。 lv_obj_align_to(obj_to_align, reference_obj, align, x, y); 上記のアライメントオプションの他に、参照オブジェクトの外側にあるオブジェクトのアライメントを行うために、以下の方法があります。
例えば、ラベルをボタンの上に配置し、ラベルを水平方向の中央に配置する場合です。 lv_obj_align_to(label, btn, LV_ALIGN_OUT_TOP_MID, 0, -10);
lv_obj_align()とは異なり、 lv_obj_align_to() は、オブジェクトの座標または下記を再調整できない事に注意して下さい。 reference object's coordinates change.
|
Size
Simple way
| 英文 | 自動翻訳 |
|---|---|
|
The width and the height of an object can be set easily as well: lv_obj_set_width(obj, 200); //Separate...
lv_obj_set_height(obj, 100);
lv_obj_set_size(obj, 200, 100); //Or in one function
Percentage values are calculated based on the parent's content area size. For example to set the object's height to the screen height: lv_obj_set_height(obj, lv_pct(100));
The size settings support a special value: It means the object's size in the respective direction will be set to the size of its children. Note that only children on the right and bottom sides will be considered and children on the top and left remain cropped. This limitation makes the behavior more predictable. Objects with The above functions set the size of an object's bounding box but the size of the content area can be set as well. This means an object's bounding box will be enlarged with the addition of padding. lv_obj_set_content_width(obj, 50); //The actual width: padding left + 50 + padding right
lv_obj_set_content_height(obj, 30); //The actual width: padding top + 30 + padding bottom
The size of the bounding box and the content area can be retrieved with the following functions: lv_coord_t w = lv_obj_get_width(obj);
lv_coord_t h = lv_obj_get_height(obj);
lv_coord_t content_w = lv_obj_get_content_width(obj);
lv_coord_t content_h = lv_obj_get_content_height(obj);
|
オブジェクトの幅や高さも簡単に設定することができます。
 lv_obj_set_width(obj, 200);       //Separate...
 lv_obj_set_height(obj, 100);
 lv_obj_set_size(obj, 200, 100); 	//Or in one function
パーセンテージの値は、親のコンテンツ領域のサイズに基づいて計算されます。例えば、オブジェクトの高さを画面の高さに設定する場合。 lv_obj_set_height(obj, lv_pct(100));
サイズ設定は特別な値 これは、オブジェクトの各方向のサイズが、その子のサイズに設定されることを意味します。 右側と下側の子だけが考慮され、上側と左側の子は切り取られたままであることに注意してください。 この制限により、動作がより予測しやすくなります。
上記の関数はオブジェクトのバウンディングボックスのサイズを設定しますが、コンテンツエリアのサイズも設定することができます。 つまり、オブジェクトのバウンディングボックスは、パディングを追加して拡大される。 lv_obj_set_content_width(obj, 50); //The actual width: padding left + 50 + padding right
lv_obj_set_content_height(obj, 30); //The actual width: padding top + 30 + padding bottom
バウンディングボックスとコンテンツ領域の大きさは、以下の関数で取得できます。 lv_coord_t w = lv_obj_get_width(obj);
lv_coord_t h = lv_obj_get_height(obj);
lv_coord_t content_w = lv_obj_get_content_width(obj);
lv_coord_t content_h = lv_obj_get_content_height(obj);
|
Using styles
| 英文 | 自動翻訳 |
|---|---|
|
Under the hood the position, size and alignment properties are style properties. The above described "simple functions" hide the style related code for the sake of simplicity and set the position, size, and alignment properties in the local styles of the object. However, using styles to set the coordinates has some great advantages:
Here are some examples to set an object's size using a style: static lv_style_t style;
lv_style_init(&style);
lv_style_set_width(&style, 100);
lv_obj_t * btn = lv_btn_create(lv_scr_act());
lv_obj_add_style(btn, &style, LV_PART_MAIN);
As you will see below there are some other great features of size and position setting. However, to keep the LVGL API lean, only the most common coordinate setting features have a "simple" version and the more complex features can be used via styles. |
フードの下では、位置、サイズ、および整列のプロパティはスタイル プロパティです。上で説明した「シンプルな関数」は、簡略化のためにスタイル関連のコードを隠して、オブジェクトのローカル スタイルに位置、サイズ、およびアライメントのプロパティを設定します。
しかし、スタイルを使って座標を設定することには、いくつかの大きな利点があります。
ここでは、スタイルを使用してオブジェクトのサイズを設定する例を紹介します。 static lv_style_t style;
lv_style_init(&style);
lv_style_set_width(&style, 100);
lv_obj_t * btn = lv_btn_create(lv_scr_act());
lv_obj_add_style(btn, &style, LV_PART_MAIN);
後述するように、サイズと位置の設定には、他にも素晴らしい機能があります。しかし、LVGL APIを無駄なく使うために、最も一般的な座標設定機能のみ「シンプル」バージョンを用意し、より複雑な機能はスタイルを介して使用できるようにしました。 |
Translation
| 英文 | 自動翻訳 |
|---|---|
|
Let's say the there are 3 buttons next to each other. Their position is set as described above. Now you want to move a button up a little when it's pressed. One way to achieve this is by setting a new Y coordinate for the pressed state: static lv_style_t style_normal;
lv_style_init(&style_normal);
lv_style_set_y(&style_normal, 100);
static lv_style_t style_pressed;
lv_style_init(&style_pressed);
lv_style_set_y(&style_pressed, 80);
lv_obj_add_style(btn1, &style_normal, LV_STATE_DEFAULT);
lv_obj_add_style(btn1, &style_pressed, LV_STATE_PRESSED);
lv_obj_add_style(btn2, &style_normal, LV_STATE_DEFAULT);
lv_obj_add_style(btn2, &style_pressed, LV_STATE_PRESSED);
lv_obj_add_style(btn3, &style_normal, LV_STATE_DEFAULT);
lv_obj_add_style(btn3, &style_pressed, LV_STATE_PRESSED);
This works, but it's not really flexible because the pressed coordinate is hard-coded. If the buttons are not at y=100, static lv_style_t style_normal;
lv_style_init(&style_normal);
lv_style_set_y(&style_normal, 100);
static lv_style_t style_pressed;
lv_style_init(&style_pressed);
lv_style_set_translate_y(&style_pressed, -20);
lv_obj_add_style(btn1, &style_normal, LV_STATE_DEFAULT);
lv_obj_add_style(btn1, &style_pressed, LV_STATE_PRESSED);
lv_obj_add_style(btn2, &style_normal, LV_STATE_DEFAULT);
lv_obj_add_style(btn2, &style_pressed, LV_STATE_PRESSED);
lv_obj_add_style(btn3, &style_normal, LV_STATE_DEFAULT);
lv_obj_add_style(btn3, &style_pressed, LV_STATE_PRESSED);
Translation is applied from the current position of the object. Percentage values can be used in translations as well. The percentage is relative to the size of the object (and not to the size of the parent). For example
Therefore, even laid out objects' position can be translated.
That means it makes the scrollbars and TransformationSimilarly to position, an object's size can be changed relative to the current size as well. The transformed width and height are added on both sides of the object. This means a 10 px transformed width makes the object 2x10 pixels wider.
In other words scrollbars, layouts, and
This code enlarges a button when it's pressed: static lv_style_t style_pressed;
lv_style_init(&style_pressed);
lv_style_set_transform_width(&style_pressed, 10);
lv_style_set_transform_height(&style_pressed, 10);
lv_obj_add_style(btn, &style_pressed, LV_STATE_PRESSED);
|
例えば、3つのボタンが隣り合っているとします。その位置は上記のように設定されています。ここで、ボタンが押されたときに、ボタンを少し上に移動させたいと思います。
これを実現する一つの方法は、押された状態のY座標を新たに設定することです。 static lv_style_t style_normal;
lv_style_init(&style_normal);
lv_style_set_y(&style_normal, 100);
static lv_style_t style_pressed;
lv_style_init(&style_pressed);
lv_style_set_y(&style_pressed, 80);
lv_obj_add_style(btn1, &style_normal, LV_STATE_DEFAULT);
lv_obj_add_style(btn1, &style_pressed, LV_STATE_PRESSED);
lv_obj_add_style(btn2, &style_normal, LV_STATE_DEFAULT);
lv_obj_add_style(btn2, &style_pressed, LV_STATE_PRESSED);
lv_obj_add_style(btn3, &style_normal, LV_STATE_DEFAULT);
lv_obj_add_style(btn3, &style_pressed, LV_STATE_PRESSED);
これは動作しますが、押された座標がハードコードされているため、あまり柔軟ではありません。ボタンが y=100 の位置にない場合、 static lv_style_t style_normal;
lv_style_init(&style_normal);
lv_style_set_y(&style_normal, 100);
static lv_style_t style_pressed;
lv_style_init(&style_pressed);
lv_style_set_translate_y(&style_pressed, -20);
lv_obj_add_style(btn1, &style_normal, LV_STATE_DEFAULT);
lv_obj_add_style(btn1, &style_pressed, LV_STATE_PRESSED);
lv_obj_add_style(btn2, &style_normal, LV_STATE_DEFAULT);
lv_obj_add_style(btn2, &style_pressed, LV_STATE_PRESSED);
lv_obj_add_style(btn3, &style_normal, LV_STATE_DEFAULT);
lv_obj_add_style(btn3, &style_pressed, LV_STATE_PRESSED);
翻訳は、オブジェクトの現在の位置から適用されます。 パーセンテージ値もトランスレーションに使用することができます。 パーセンテージはオブジェクトのサイズに対する相対値です(親のサイズに対するものではありません)。 例えば、
したがって、レイアウトされたオブジェクトの位置も移動させることができます。
つまり、スクロールバーや Transformation位置と同様に、オブジェクトのサイズも現在のサイズから相対的に変更することができます。 変換された幅と高さは、オブジェクトの両側で追加されます。 つまり、10 px の変換された幅は、オブジェクトの幅を 2x10 ピクセルにします。
言い換えれば、スクロールバー、レイアウト、および
 static lv_style_t style_pressed;
 lv_style_init(&style_pressed);
 lv_style_set_transform_width(&style_pressed, 10);
 lv_style_set_transform_height(&style_pressed, 10);

 lv_obj_add_style(btn, &style_pressed, LV_STATE_PRESSED);
|
Min and Max size
| 英文 | 自動翻訳 |
|---|---|
|
Similarly to CSS, LVGL also supports These are limits preventing an object's size from becoming smaller/larger than these values. They are especially useful if the size is set by percentage or static lv_style_t style_max_height;
lv_style_init(&style_max_height);
lv_style_set_y(&style_max_height, 200);
lv_obj_set_height(obj, lv_pct(100));
lv_obj_add_style(obj, &style_max_height, LV_STATE_DEFAULT); //Limit the height to 200 px
Percentage values can be used as well which are relative to the size of the parent's content area. static lv_style_t style_max_height;
lv_style_init(&style_max_height);
lv_style_set_y(&style_max_height, lv_pct(50));
lv_obj_set_height(obj, lv_pct(100));
lv_obj_add_style(obj, &style_max_height, LV_STATE_DEFAULT); //Limit the height to half parent height
|
CSSと同様に、LVGLもmin-width, max-width, min-height and max-height.をサポートしています。
これらは、オブジェクトのサイズがこれらの値より小さくなったり大きくなったりするのを防ぐための制限です。 特に、サイズがパーセンテージや static lv_style_t style_max_height;
lv_style_init(&style_max_height);
lv_style_set_y(&style_max_height, 200);
lv_obj_set_height(obj, lv_pct(100));
lv_obj_add_style(obj, &style_max_height, LV_STATE_DEFAULT); //Limit the height to 200 px
また、親のコンテンツ領域のサイズに対する相対値であるパーセンテージを使用することもできる。 static lv_style_t style_max_height;
lv_style_init(&style_max_height);
lv_style_set_y(&style_max_height, lv_pct(50));
lv_obj_set_height(obj, lv_pct(100));
lv_obj_add_style(obj, &style_max_height, LV_STATE_DEFAULT); //Limit the height to half parent height
|
Layout
Overview
| 英文 | 自動翻訳 |
|---|---|
|
Layouts can update the position and size of an object's children. They can be used to automatically arrange the children into a line or column, or in much more complicated forms. The position and size set by the layout overwrites the "normal" x, y, width, and height settings. There is only one function that is the same for every layout: |
レイアウトは、オブジェクトの子の位置や大きさを更新することができます。
レイアウトは、子オブジェクトを自動的に行や列に並べるために使用されますが、より複雑な形式でも使用できます。
|
Built-in layout
| 英文 | 自動翻訳 |
|---|---|
|
LVGL comes with two very powerful layouts:
Both are heavily inspired by the CSS layouts with the same name. |
LVGLには、非常に強力な2つのレイアウトが搭載されています。
どちらも、同じ名前のCSSレイアウトに大きく触発されています。 |
Flags
| 英文 | 自動翻訳 |
|---|---|
|
There are some flags that can be used on objects to affect how they behave with layouts:
These flags can be added/removed with |
オブジェクトに使用できるフラグがいくつかあり、レイアウトでの動作に影響を与えることができます。
これらのフラグは |
Adding new layouts
| 英文 | 自動翻訳 |
|---|---|
|
LVGL can be freely extended by a custom layout like this: uint32_t MY_LAYOUT;
...
MY_LAYOUT = lv_layout_register(my_layout_update, &user_data);
...
void my_layout_update(lv_obj_t * obj, void * user_data)
{
/*Will be called automatically if it's required to reposition/resize the children of "obj" */
}
Custom style properties can be added which can be retrieved and used in the update callback. For example: uint32_t MY_PROP;
...
LV_STYLE_MY_PROP = lv_style_register_prop();
...
static inline void lv_style_set_my_prop(lv_style_t * style, uint32_t value)
{
lv_style_value_t v = {
.num = (int32_t)value
};
lv_style_set_prop(style, LV_STYLE_MY_PROP, v);
}
|
LVGLは、このようにカスタムレイアウトで自由に拡張することが可能です。
 uint32_t MY_LAYOUT;

 ...

 MY_LAYOUT = lv_layout_register(my_layout_update, &user_data);

 ...

 void my_layout_update(lv_obj_t * obj, void * user_data)
 {
 	/*Will be called automatically if it's required to reposition/resize the children of "obj" */
 }
カスタムスタイルプロパティを追加して、更新コールバックで取得し使用することができます。たとえば、以下のようになります。 uint32_t MY_PROP;
...
LV_STYLE_MY_PROP = lv_style_register_prop();
...
static inline void lv_style_set_my_prop(lv_style_t * style, uint32_t value)
{
lv_style_value_t v = {
.num = (int32_t)value
};
lv_style_set_prop(style, LV_STYLE_MY_PROP, v);
}
|