「App:Library:LVGL:docs:Overview:Positions, sizes, and layouts」の版間の差分
| 1行目: | 1行目: | ||
https://docs.lvgl.io/8.2/overview/coords.html | https://docs.lvgl.io/8.2/overview/coords.html | ||
__NOTOC__ | __NOTOC__ | ||
| + | = Positions, sizes, and layouts = | ||
| + | == Overview == | ||
{| class="wikitable" | {| class="wikitable" | ||
!英文 | !英文 | ||
| 6行目: | 8行目: | ||
|- | |- | ||
| | | | ||
| − | |||
| − | |||
| − | |||
| − | |||
| − | |||
| − | |||
| − | |||
| − | |||
Similarly to many other parts of LVGL, the concept of setting the coordinates was inspired by CSS. LVGL has by no means a complete implementation of CSS but a comparable subset is implemented (sometimes with minor adjustments). | Similarly to many other parts of LVGL, the concept of setting the coordinates was inspired by CSS. LVGL has by no means a complete implementation of CSS but a comparable subset is implemented (sometimes with minor adjustments). | ||
| 24行目: | 18行目: | ||
* width/height means the full size, the "content area" is smaller with padding and border width | * width/height means the full size, the "content area" is smaller with padding and border width | ||
* a subset of flexbox and grid layouts are supported | * a subset of flexbox and grid layouts are supported | ||
| + | | | ||
| + | |} | ||
| + | :[[App:Library:LVGL#Overview|戻る : Previous]] | ||
| + | |||
=== Units === | === Units === | ||
| + | {| class="wikitable" | ||
| + | !英文 | ||
| + | !自動翻訳 | ||
| + | |- | ||
| + | | | ||
| + | * pixel: Simply a position in pixels. An integer always means pixels. E.g. <code style="color: #bb0000;">lv_obj_set_x(btn, 10)</code> | ||
| + | * percentage: The percentage of the size of the object or its parent (depending on the property). <code style="color: #bb0000;">lv_pct(value)</code> converts a value to percentage. E.g. <code style="color: #bb0000;">lv_obj_set_width(btn, lv_pct(50))</code> | ||
| + | * <code style="color: #bb0000;">LV_SIZE_CONTENT</code>: Special value to set the width/height of an object to involve all the children. It's similar to <code style="color: #bb0000;">auto</code> in CSS. E.g. <code style="color: #bb0000;">lv_obj_set_width(btn, LV_SIZE_CONTENT)</code>. | ||
| + | | | ||
| + | |} | ||
| + | :[[App:Library:LVGL#Overview|戻る : Previous]] | ||
| − | |||
| − | |||
| − | |||
=== Boxing model === | === Boxing model === | ||
| + | {| class="wikitable" | ||
| + | !英文 | ||
| + | !自動翻訳 | ||
| + | |- | ||
| + | | | ||
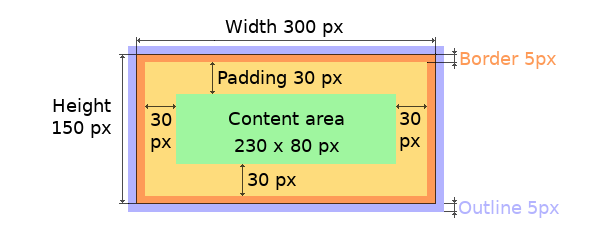
LVGL follows CSS's border-box model. An object's "box" is built from the following parts: | LVGL follows CSS's border-box model. An object's "box" is built from the following parts: | ||
| 45行目: | 56行目: | ||
The outline is drawn outside the bounding box. | The outline is drawn outside the bounding box. | ||
| + | | | ||
| + | |} | ||
| + | :[[App:Library:LVGL#Overview|戻る : Previous]] | ||
| + | |||
=== Important notes === | === Important notes === | ||
| + | {| class="wikitable" | ||
| + | !英文 | ||
| + | !自動翻訳 | ||
| + | |- | ||
| + | | | ||
This section describes special cases in which LVGL's behavior might be unexpected. | This section describes special cases in which LVGL's behavior might be unexpected. | ||
| + | | | ||
| + | |} | ||
| + | :[[App:Library:LVGL#Overview|戻る : Previous]] | ||
| + | |||
==== Postponed coordinate calculation ==== | ==== Postponed coordinate calculation ==== | ||
| + | {| class="wikitable" | ||
| + | !英文 | ||
| + | !自動翻訳 | ||
| + | |- | ||
| + | | | ||
LVGL doesn't recalculate all the coordinate changes immediately. This is done to improve performance. Instead, the objects are marked as "dirty" and before redrawing the screen LVGL checks if there are any "dirty" objects. If so it refreshes their position, size and layout. | LVGL doesn't recalculate all the coordinate changes immediately. This is done to improve performance. Instead, the objects are marked as "dirty" and before redrawing the screen LVGL checks if there are any "dirty" objects. If so it refreshes their position, size and layout. | ||
| − | In other words, if you need to get the coordinate of an object and the coordinates were just changed, LVGL needs to be forced to recalculate the coordinates. To do this call <code>lv_obj_update_layout(obj)</code>. | + | In other words, if you need to get the coordinate of an object and the coordinates were just changed, LVGL needs to be forced to recalculate the coordinates. To do this call <code style="color: #bb0000;">lv_obj_update_layout(obj)</code>. |
| + | |||
| + | The size and position might depend on the parent or layout. Therefore <code style="color: #bb0000;">lv_obj_update_layout</code> recalculates the coordinates of all objects on the screen of <code style="color: #bb0000;">obj</code>. | ||
| + | | | ||
| + | |} | ||
| + | :[[App:Library:LVGL#Overview|戻る : Previous]] | ||
| − | |||
==== Removing styles ==== | ==== Removing styles ==== | ||
| − | As it's described in the Using styles section, coordinates can also be set via style properties. To be more precise, under the hood every style coordinate related property is stored as a style property. If you use <code>lv_obj_set_x(obj, 20)</code> LVGL saves <code>x=20</code> in the local style of the object. | + | {| class="wikitable" |
| + | !英文 | ||
| + | !自動翻訳 | ||
| + | |- | ||
| + | | | ||
| + | As it's described in the Using styles section, coordinates can also be set via style properties. To be more precise, under the hood every style coordinate related property is stored as a style property. If you use <code style="color: #bb0000;">lv_obj_set_x(obj, 20)</code> LVGL saves <code style="color: #bb0000;">x=20</code> in the local style of the object. | ||
| − | This is an internal mechanism and doesn't matter much as you use LVGL. However, there is one case in which you need to be aware of the implementation. If the style(s) of an object are removed by | + | This is an internal mechanism and doesn't matter much as you use LVGL. However, there is one case in which you need to be aware of the implementation. If the style(s) of an object are<syntaxhighlight lang="C++" style="border:1px dashed gray;"> |
| + | removed by | ||
lv_obj_remove_style_all(obj) | lv_obj_remove_style_all(obj) | ||
| + | </syntaxhighlight> | ||
or | or | ||
| + | <syntaxhighlight lang="C++" style="border:1px dashed gray;"> | ||
lv_obj_remove_style(obj, NULL, LV_PART_MAIN); | lv_obj_remove_style(obj, NULL, LV_PART_MAIN); | ||
| + | </syntaxhighlight> | ||
the earlier set coordinates will be removed as well. | the earlier set coordinates will be removed as well. | ||
For example: | For example: | ||
| + | <syntaxhighlight lang="C++" style="border:1px dashed gray;"> | ||
/*The size of obj1 will be set back to the default in the end*/ | /*The size of obj1 will be set back to the default in the end*/ | ||
lv_obj_set_size(obj1, 200, 100); /*Now obj1 has 200;100 size*/ | lv_obj_set_size(obj1, 200, 100); /*Now obj1 has 200;100 size*/ | ||
| 74行目: | 117行目: | ||
lv_obj_remove_style_all(obj2); | lv_obj_remove_style_all(obj2); | ||
lv_obj_set_size(obj2, 200, 100); | lv_obj_set_size(obj2, 200, 100); | ||
| + | </syntaxhighlight> | ||
| + | | | ||
| + | |} | ||
| + | :[[App:Library:LVGL#Overview|戻る : Previous]] | ||
| + | |||
== Position == | == Position == | ||
| − | |||
=== Simple way === | === Simple way === | ||
| + | {| class="wikitable" | ||
| + | !英文 | ||
| + | !自動翻訳 | ||
| + | |- | ||
| + | | | ||
To simply set the x and y coordinates of an object use: | To simply set the x and y coordinates of an object use: | ||
| + | <syntaxhighlight lang="C++" style="border:1px dashed gray;"> | ||
lv_obj_set_x(obj, 10); //Separate... | lv_obj_set_x(obj, 10); //Separate... | ||
lv_obj_set_y(obj, 20); | lv_obj_set_y(obj, 20); | ||
lv_obj_set_pos(obj, 10, 20); //Or in one function | lv_obj_set_pos(obj, 10, 20); //Or in one function | ||
| − | By default, the x and y coordinates are measured from the top left corner of the parent's content area. For example if the parent has five pixels of padding on every side the above code will place <code>obj</code> at (15, 25) because the content area starts after the padding. | + | </syntaxhighlight> |
| + | By default, the x and y coordinates are measured from the top left corner of the parent's content area. For example if the parent has five pixels of padding on every side the above code will place <code style="color: #bb0000;">obj</code> at (15, 25) because the content area starts after the padding. | ||
Percentage values are calculated from the parent's content area size. | Percentage values are calculated from the parent's content area size. | ||
| + | <syntaxhighlight lang="C++" style="border:1px dashed gray;"> | ||
lv_obj_set_x(btn, lv_pct(10)); //x = 10 % of parent content area width | lv_obj_set_x(btn, lv_pct(10)); //x = 10 % of parent content area width | ||
| + | </syntaxhighlight> | ||
| + | | | ||
| + | |} | ||
| + | :[[App:Library:LVGL#Overview|戻る : Previous]] | ||
| + | |||
=== Align === | === Align === | ||
| + | {| class="wikitable" | ||
| + | !英文 | ||
| + | !自動翻訳 | ||
| + | |- | ||
| + | | | ||
In some cases it's convenient to change the origin of the positioning from the default top left. If the origin is changed e.g. to bottom-right, the (0,0) position means: align to the bottom-right corner. To change the origin use: | In some cases it's convenient to change the origin of the positioning from the default top left. If the origin is changed e.g. to bottom-right, the (0,0) position means: align to the bottom-right corner. To change the origin use: | ||
| + | <syntaxhighlight lang="C++" style="border:1px dashed gray;"> | ||
lv_obj_set_align(obj, align); | lv_obj_set_align(obj, align); | ||
| + | </syntaxhighlight> | ||
To change the alignment and set new coordinates: | To change the alignment and set new coordinates: | ||
| + | <syntaxhighlight lang="C++" style="border:1px dashed gray;"> | ||
lv_obj_align(obj, align, x, y); | lv_obj_align(obj, align, x, y); | ||
| + | </syntaxhighlight> | ||
The following alignment options can be used: | The following alignment options can be used: | ||
| − | * <code>LV_ALIGN_TOP_LEFT</code> | + | * <code style="color: #bb0000;">LV_ALIGN_TOP_LEFT</code> |
| − | * <code>LV_ALIGN_TOP_MID</code> | + | * <code style="color: #bb0000;">LV_ALIGN_TOP_MID</code> |
| − | * <code>LV_ALIGN_TOP_RIGHT</code> | + | * <code style="color: #bb0000;">LV_ALIGN_TOP_RIGHT</code> |
| − | * <code>LV_ALIGN_BOTTOM_LEFT</code> | + | * <code style="color: #bb0000;">LV_ALIGN_BOTTOM_LEFT</code> |
| − | * <code>LV_ALIGN_BOTTOM_MID</code> | + | * <code style="color: #bb0000;">LV_ALIGN_BOTTOM_MID</code> |
| − | * <code>LV_ALIGN_BOTTOM_RIGHT</code> | + | * <code style="color: #bb0000;">LV_ALIGN_BOTTOM_RIGHT</code> |
| − | * <code>LV_ALIGN_LEFT_MID</code> | + | * <code style="color: #bb0000;">LV_ALIGN_LEFT_MID</code> |
| − | * <code>LV_ALIGN_RIGHT_MID</code> | + | * <code style="color: #bb0000;">LV_ALIGN_RIGHT_MID</code> |
| − | * <code>LV_ALIGN_CENTER</code> | + | * <code style="color: #bb0000;">LV_ALIGN_CENTER</code> |
It's quite common to align a child to the center of its parent, therefore a dedicated function exists: | It's quite common to align a child to the center of its parent, therefore a dedicated function exists: | ||
| + | <syntaxhighlight lang="C++" style="border:1px dashed gray;"> | ||
lv_obj_center(obj); | lv_obj_center(obj); | ||
//Has the same effect | //Has the same effect | ||
lv_obj_align(obj, LV_ALIGN_CENTER, 0, 0); | lv_obj_align(obj, LV_ALIGN_CENTER, 0, 0); | ||
| + | </syntaxhighlight> | ||
If the parent's size changes, the set alignment and position of the children is updated automatically. | If the parent's size changes, the set alignment and position of the children is updated automatically. | ||
| 115行目: | 186行目: | ||
Besides the alignments options above, the following can be used to align an object outside the reference object: | Besides the alignments options above, the following can be used to align an object outside the reference object: | ||
| − | * <code>LV_ALIGN_OUT_TOP_LEFT</code> | + | * <code style="color: #bb0000;">LV_ALIGN_OUT_TOP_LEFT</code> |
| − | * <code>LV_ALIGN_OUT_TOP_MID</code> | + | * <code style="color: #bb0000;">LV_ALIGN_OUT_TOP_MID</code> |
| − | * <code>LV_ALIGN_OUT_TOP_RIGHT</code> | + | * <code style="color: #bb0000;">LV_ALIGN_OUT_TOP_RIGHT</code> |
| − | * <code>LV_ALIGN_OUT_BOTTOM_LEFT</code> | + | * <code style="color: #bb0000;">LV_ALIGN_OUT_BOTTOM_LEFT</code> |
| − | * <code>LV_ALIGN_OUT_BOTTOM_MID</code> | + | * <code style="color: #bb0000;">LV_ALIGN_OUT_BOTTOM_MID</code> |
| − | * <code>LV_ALIGN_OUT_BOTTOM_RIGHT</code> | + | * <code style="color: #bb0000;">LV_ALIGN_OUT_BOTTOM_RIGHT</code> |
| − | * <code>LV_ALIGN_OUT_LEFT_TOP</code> | + | * <code style="color: #bb0000;">LV_ALIGN_OUT_LEFT_TOP</code> |
| − | * <code>LV_ALIGN_OUT_LEFT_MID</code> | + | * <code style="color: #bb0000;">LV_ALIGN_OUT_LEFT_MID</code> |
| − | * <code>LV_ALIGN_OUT_LEFT_BOTTOM</code> | + | * <code style="color: #bb0000;">LV_ALIGN_OUT_LEFT_BOTTOM</code> |
| − | * <code>LV_ALIGN_OUT_RIGHT_TOP</code> | + | * <code style="color: #bb0000;">LV_ALIGN_OUT_RIGHT_TOP</code> |
| − | * <code>LV_ALIGN_OUT_RIGHT_MID</code> | + | * <code style="color: #bb0000;">LV_ALIGN_OUT_RIGHT_MID</code> |
| − | * <code>LV_ALIGN_OUT_RIGHT_BOTTOM</code> | + | * <code style="color: #bb0000;">LV_ALIGN_OUT_RIGHT_BOTTOM</code> |
For example to align a label above a button and center the label horizontally: | For example to align a label above a button and center the label horizontally: | ||
| + | <syntaxhighlight lang="C++" style="border:1px dashed gray;"> | ||
lv_obj_align_to(label, btn, LV_ALIGN_OUT_TOP_MID, 0, -10); | lv_obj_align_to(label, btn, LV_ALIGN_OUT_TOP_MID, 0, -10); | ||
| − | Note that, unlike with <code>lv_obj_align()</code>, <code>lv_obj_align_to()</code> can not realign the object if its coordinates or the reference object's coordinates change. | + | </syntaxhighlight> |
| − | + | Note that, unlike with <code style="color: #bb0000;">lv_obj_align()</code>, <code style="color: #bb0000;">lv_obj_align_to()</code> can not realign the object if its coordinates or the<syntaxhighlight lang="C++" style="border:1px dashed gray;"> | |
| + | reference object's coordinates change. | ||
| + | </syntaxhighlight> | ||
| + | | | ||
| + | |} | ||
| + | :[[App:Library:LVGL#Overview|戻る : Previous]] | ||
== Size == | == Size == | ||
| − | |||
=== Simple way === | === Simple way === | ||
| + | {| class="wikitable" | ||
| + | !英文 | ||
| + | !自動翻訳 | ||
| + | |- | ||
| + | | | ||
The width and the height of an object can be set easily as well: | The width and the height of an object can be set easily as well: | ||
| + | <syntaxhighlight lang="C++" style="border:1px dashed gray;"> | ||
lv_obj_set_width(obj, 200); //Separate... | lv_obj_set_width(obj, 200); //Separate... | ||
lv_obj_set_height(obj, 100); | lv_obj_set_height(obj, 100); | ||
lv_obj_set_size(obj, 200, 100); //Or in one function | lv_obj_set_size(obj, 200, 100); //Or in one function | ||
| + | </syntaxhighlight> | ||
Percentage values are calculated based on the parent's content area size. For example to set the object's height to the screen height: | Percentage values are calculated based on the parent's content area size. For example to set the object's height to the screen height: | ||
| + | <syntaxhighlight lang="C++" style="border:1px dashed gray;"> | ||
lv_obj_set_height(obj, lv_pct(100)); | lv_obj_set_height(obj, lv_pct(100)); | ||
| − | The size settings support a special value: <code>LV_SIZE_CONTENT</code>. It means the object's size in the respective direction will be set to the size of its children. Note that only children on the right and bottom sides will be considered and children on the top and left remain cropped. This limitation makes the behavior more predictable. | + | </syntaxhighlight> |
| + | The size settings support a special value: <code style="color: #bb0000;">LV_SIZE_CONTENT</code>. It means the object's size in the respective direction will be set to the size of its children. Note that only children on the right and bottom sides will be considered and children on the top and left remain cropped. This limitation makes the behavior more predictable. | ||
| − | Objects with <code>LV_OBJ_FLAG_HIDDEN</code> or <code>LV_OBJ_FLAG_FLOATING</code> will be ignored by the <code>LV_SIZE_CONTENT</code> calculation. | + | Objects with <code style="color: #bb0000;">LV_OBJ_FLAG_HIDDEN</code> or <code style="color: #bb0000;">LV_OBJ_FLAG_FLOATING</code> will be ignored by the <code style="color: #bb0000;">LV_SIZE_CONTENT</code> calculation. |
The above functions set the size of an object's bounding box but the size of the content area can be set as well. This means an object's bounding box will be enlarged with the addition of padding. | The above functions set the size of an object's bounding box but the size of the content area can be set as well. This means an object's bounding box will be enlarged with the addition of padding. | ||
| + | <syntaxhighlight lang="C++" style="border:1px dashed gray;"> | ||
lv_obj_set_content_width(obj, 50); //The actual width: padding left + 50 + padding right | lv_obj_set_content_width(obj, 50); //The actual width: padding left + 50 + padding right | ||
lv_obj_set_content_height(obj, 30); //The actual width: padding top + 30 + padding bottom | lv_obj_set_content_height(obj, 30); //The actual width: padding top + 30 + padding bottom | ||
| + | </syntaxhighlight> | ||
The size of the bounding box and the content area can be retrieved with the following functions: | The size of the bounding box and the content area can be retrieved with the following functions: | ||
| + | <syntaxhighlight lang="C++" style="border:1px dashed gray;"> | ||
lv_coord_t w = lv_obj_get_width(obj); | lv_coord_t w = lv_obj_get_width(obj); | ||
lv_coord_t h = lv_obj_get_height(obj); | lv_coord_t h = lv_obj_get_height(obj); | ||
lv_coord_t content_w = lv_obj_get_content_width(obj); | lv_coord_t content_w = lv_obj_get_content_width(obj); | ||
lv_coord_t content_h = lv_obj_get_content_height(obj); | lv_coord_t content_h = lv_obj_get_content_height(obj); | ||
| + | </syntaxhighlight> | ||
| + | | | ||
| + | |} | ||
| + | :[[App:Library:LVGL#Overview|戻る : Previous]] | ||
| + | |||
== Using styles == | == Using styles == | ||
| + | {| class="wikitable" | ||
| + | !英文 | ||
| + | !自動翻訳 | ||
| + | |- | ||
| + | | | ||
Under the hood the position, size and alignment properties are style properties. The above described "simple functions" hide the style related code for the sake of simplicity and set the position, size, and alignment properties in the local styles of the object. | Under the hood the position, size and alignment properties are style properties. The above described "simple functions" hide the style related code for the sake of simplicity and set the position, size, and alignment properties in the local styles of the object. | ||
| 163行目: | 261行目: | ||
* It makes it easy to set the width/height/etc. for several objects together. E.g. make all the sliders 100x10 pixels sized. | * It makes it easy to set the width/height/etc. for several objects together. E.g. make all the sliders 100x10 pixels sized. | ||
* It also makes possible to modify the values in one place. | * It also makes possible to modify the values in one place. | ||
| − | * The values can be partially overwritten by other styles. For example <code>style_btn</code> makes the object <code>100x50</code> by default but adding <code>style_full_width</code> overwrites only the width of the object. | + | * The values can be partially overwritten by other styles. For example <code style="color: #bb0000;">style_btn</code> makes the object <code style="color: #bb0000;">100x50</code> by default but adding <code style="color: #bb0000;">style_full_width</code> overwrites only the width of the object. |
| − | * The object can have different position or size depending on state. E.g. 100 px wide in <code>LV_STATE_DEFAULT</code> but 120 px in <code>LV_STATE_PRESSED</code>. | + | * The object can have different position or size depending on state. E.g. 100 px wide in <code style="color: #bb0000;">LV_STATE_DEFAULT</code> but 120 px in <code style="color: #bb0000;">LV_STATE_PRESSED</code>. |
* Style transitions can be used to make the coordinate changes smooth. | * Style transitions can be used to make the coordinate changes smooth. | ||
Here are some examples to set an object's size using a style: | Here are some examples to set an object's size using a style: | ||
| + | <syntaxhighlight lang="C++" style="border:1px dashed gray;"> | ||
static lv_style_t style; | static lv_style_t style; | ||
lv_style_init(&style); | lv_style_init(&style); | ||
| 174行目: | 273行目: | ||
lv_obj_t * btn = lv_btn_create(lv_scr_act()); | lv_obj_t * btn = lv_btn_create(lv_scr_act()); | ||
lv_obj_add_style(btn, &style, LV_PART_MAIN); | lv_obj_add_style(btn, &style, LV_PART_MAIN); | ||
| + | </syntaxhighlight> | ||
As you will see below there are some other great features of size and position setting. However, to keep the LVGL API lean, only the most common coordinate setting features have a "simple" version and the more complex features can be used via styles. | As you will see below there are some other great features of size and position setting. However, to keep the LVGL API lean, only the most common coordinate setting features have a "simple" version and the more complex features can be used via styles. | ||
| + | | | ||
| + | |} | ||
| + | :[[App:Library:LVGL#Overview|戻る : Previous]] | ||
| + | |||
== Translation == | == Translation == | ||
| + | {| class="wikitable" | ||
| + | !英文 | ||
| + | !自動翻訳 | ||
| + | |- | ||
| + | | | ||
Let's say the there are 3 buttons next to each other. Their position is set as described above. Now you want to move a button up a little when it's pressed. | Let's say the there are 3 buttons next to each other. Their position is set as described above. Now you want to move a button up a little when it's pressed. | ||
One way to achieve this is by setting a new Y coordinate for the pressed state: | One way to achieve this is by setting a new Y coordinate for the pressed state: | ||
| + | <syntaxhighlight lang="C++" style="border:1px dashed gray;"> | ||
static lv_style_t style_normal; | static lv_style_t style_normal; | ||
lv_style_init(&style_normal); | lv_style_init(&style_normal); | ||
| 196行目: | 306行目: | ||
lv_obj_add_style(btn3, &style_normal, LV_STATE_DEFAULT); | lv_obj_add_style(btn3, &style_normal, LV_STATE_DEFAULT); | ||
lv_obj_add_style(btn3, &style_pressed, LV_STATE_PRESSED); | lv_obj_add_style(btn3, &style_pressed, LV_STATE_PRESSED); | ||
| − | This works, but it's not really flexible because the pressed coordinate is hard-coded. If the buttons are not at y=100, <code>style_pressed</code> won't work as expected. Translations can be used to solve this: | + | </syntaxhighlight> |
| + | This works, but it's not really flexible because the pressed coordinate is hard-coded. If the buttons are not at y=100, <code style="color: #bb0000;">style_pressed</code> won't work as expected. Translations can be used to solve this: | ||
| + | <syntaxhighlight lang="C++" style="border:1px dashed gray;"> | ||
static lv_style_t style_normal; | static lv_style_t style_normal; | ||
lv_style_init(&style_normal); | lv_style_init(&style_normal); | ||
| 213行目: | 325行目: | ||
lv_obj_add_style(btn3, &style_normal, LV_STATE_DEFAULT); | lv_obj_add_style(btn3, &style_normal, LV_STATE_DEFAULT); | ||
lv_obj_add_style(btn3, &style_pressed, LV_STATE_PRESSED); | lv_obj_add_style(btn3, &style_pressed, LV_STATE_PRESSED); | ||
| + | </syntaxhighlight> | ||
Translation is applied from the current position of the object. | Translation is applied from the current position of the object. | ||
| − | Percentage values can be used in translations as well. The percentage is relative to the size of the object (and not to the size of the parent). For example <code>lv_pct(50)</code> will move the object with half of its width/height. | + | Percentage values can be used in translations as well. The percentage is relative to the size of the object (and not to the size of the parent). For example <code style="color: #bb0000;">lv_pct(50)</code> will move the object with half of its width/height. |
The translation is applied after the layouts are calculated. Therefore, even laid out objects' position can be translated. | The translation is applied after the layouts are calculated. Therefore, even laid out objects' position can be translated. | ||
| − | The translation actually moves the object. That means it makes the scrollbars and <code>LV_SIZE_CONTENT</code> sized objects react to the position change. | + | The translation actually moves the object. That means it makes the scrollbars and <code style="color: #bb0000;">LV_SIZE_CONTENT</code> sized objects react to the position change. |
== Transformation == | == Transformation == | ||
Similarly to position, an object's size can be changed relative to the current size as well. The transformed width and height are added on both sides of the object. This means a 10 px transformed width makes the object 2x10 pixels wider. | Similarly to position, an object's size can be changed relative to the current size as well. The transformed width and height are added on both sides of the object. This means a 10 px transformed width makes the object 2x10 pixels wider. | ||
| − | Unlike position translation, the size transformation doesn't make the object "really" larger. In other words scrollbars, layouts, and <code>LV_SIZE_CONTENT</code> will not react to the transformed size. Hence, size transformation is "only" a visual effect. | + | Unlike position translation, the size transformation doesn't make the object "really" larger. In other words scrollbars, layouts, and <code style="color: #bb0000;">LV_SIZE_CONTENT</code> will not react to the transformed size. Hence, size transformation is "only" a visual effect. |
This code enlarges a button when it's pressed: | This code enlarges a button when it's pressed: | ||
| + | <syntaxhighlight lang="C++" style="border:1px dashed gray;"> | ||
static lv_style_t style_pressed; | static lv_style_t style_pressed; | ||
lv_style_init(&style_pressed); | lv_style_init(&style_pressed); | ||
| 233行目: | 347行目: | ||
lv_obj_add_style(btn, &style_pressed, LV_STATE_PRESSED); | lv_obj_add_style(btn, &style_pressed, LV_STATE_PRESSED); | ||
| + | </syntaxhighlight> | ||
| + | | | ||
| + | |} | ||
| + | :[[App:Library:LVGL#Overview|戻る : Previous]] | ||
| + | |||
=== Min and Max size === | === Min and Max size === | ||
| − | Similarly to CSS, LVGL also supports <code>min-width</code>, <code>max-width</code>, <code>min-height</code> and <code>max-height</code>. These are limits preventing an object's size from becoming smaller/larger than these values. They are especially useful if the size is set by percentage or <code>LV_SIZE_CONTENT</code>. | + | {| class="wikitable" |
| + | !英文 | ||
| + | !自動翻訳 | ||
| + | |- | ||
| + | | | ||
| + | Similarly to CSS, LVGL also supports <code style="color: #bb0000;">min-width</code>, <code style="color: #bb0000;">max-width</code>, <code style="color: #bb0000;">min-height</code> and <code style="color: #bb0000;">max-height</code>. These are limits preventing an object's size from becoming smaller/larger than these values. They are especially useful if the size is set by percentage or <code style="color: #bb0000;">LV_SIZE_CONTENT</code>. | ||
| + | <syntaxhighlight lang="C++" style="border:1px dashed gray;"> | ||
static lv_style_t style_max_height; | static lv_style_t style_max_height; | ||
lv_style_init(&style_max_height); | lv_style_init(&style_max_height); | ||
| 242行目: | 367行目: | ||
lv_obj_set_height(obj, lv_pct(100)); | lv_obj_set_height(obj, lv_pct(100)); | ||
lv_obj_add_style(obj, &style_max_height, LV_STATE_DEFAULT); //Limit the height to 200 px | lv_obj_add_style(obj, &style_max_height, LV_STATE_DEFAULT); //Limit the height to 200 px | ||
| + | </syntaxhighlight> | ||
Percentage values can be used as well which are relative to the size of the parent's content area. | Percentage values can be used as well which are relative to the size of the parent's content area. | ||
| + | <syntaxhighlight lang="C++" style="border:1px dashed gray;"> | ||
static lv_style_t style_max_height; | static lv_style_t style_max_height; | ||
lv_style_init(&style_max_height); | lv_style_init(&style_max_height); | ||
| 249行目: | 376行目: | ||
lv_obj_set_height(obj, lv_pct(100)); | lv_obj_set_height(obj, lv_pct(100)); | ||
lv_obj_add_style(obj, &style_max_height, LV_STATE_DEFAULT); //Limit the height to half parent height | lv_obj_add_style(obj, &style_max_height, LV_STATE_DEFAULT); //Limit the height to half parent height | ||
| + | </syntaxhighlight> | ||
| + | | | ||
| + | |} | ||
| + | :[[App:Library:LVGL#Overview|戻る : Previous]] | ||
| + | |||
== Layout == | == Layout == | ||
| − | |||
=== Overview === | === Overview === | ||
| + | {| class="wikitable" | ||
| + | !英文 | ||
| + | !自動翻訳 | ||
| + | |- | ||
| + | | | ||
Layouts can update the position and size of an object's children. They can be used to automatically arrange the children into a line or column, or in much more complicated forms. | Layouts can update the position and size of an object's children. They can be used to automatically arrange the children into a line or column, or in much more complicated forms. | ||
The position and size set by the layout overwrites the "normal" x, y, width, and height settings. | The position and size set by the layout overwrites the "normal" x, y, width, and height settings. | ||
| − | There is only one function that is the same for every layout: <code>lv_obj_set_layout(obj, <LAYOUT_NAME>)</code> sets the layout on an object. For further settings of the parent and children see the documentation of the given layout. | + | There is only one function that is the same for every layout: <code style="color: #bb0000;">lv_obj_set_layout(obj, <LAYOUT_NAME>)</code> sets the layout on an object. For further settings of the parent and children see the documentation of the given layout. |
| + | | | ||
| + | |} | ||
| + | :[[App:Library:LVGL#Overview|戻る : Previous]] | ||
| + | |||
=== Built-in layout === | === Built-in layout === | ||
| + | {| class="wikitable" | ||
| + | !英文 | ||
| + | !自動翻訳 | ||
| + | |- | ||
| + | | | ||
LVGL comes with two very powerful layouts: | LVGL comes with two very powerful layouts: | ||
| 266行目: | 411行目: | ||
Both are heavily inspired by the CSS layouts with the same name. | Both are heavily inspired by the CSS layouts with the same name. | ||
| + | | | ||
| + | |} | ||
| + | :[[App:Library:LVGL#Overview|戻る : Previous]] | ||
| + | |||
=== Flags === | === Flags === | ||
| + | {| class="wikitable" | ||
| + | !英文 | ||
| + | !自動翻訳 | ||
| + | |- | ||
| + | | | ||
There are some flags that can be used on objects to affect how they behave with layouts: | There are some flags that can be used on objects to affect how they behave with layouts: | ||
| − | * <code>LV_OBJ_FLAG_HIDDEN</code> Hidden objects are ignored in layout calculations. | + | * <code style="color: #bb0000;">LV_OBJ_FLAG_HIDDEN</code> Hidden objects are ignored in layout calculations. |
| − | * <code>LV_OBJ_FLAG_IGNORE_LAYOUT</code> The object is simply ignored by the layouts. Its coordinates can be set as usual. | + | * <code style="color: #bb0000;">LV_OBJ_FLAG_IGNORE_LAYOUT</code> The object is simply ignored by the layouts. Its coordinates can be set as usual. |
| − | * <code>LV_OBJ_FLAG_FLOATING</code> Same as <code>LV_OBJ_FLAG_IGNORE_LAYOUT</code> but the object with <code>LV_OBJ_FLAG_FLOATING</code> will be ignored in <code>LV_SIZE_CONTENT</code> calculations. | + | * <code style="color: #bb0000;">LV_OBJ_FLAG_FLOATING</code> Same as <code style="color: #bb0000;">LV_OBJ_FLAG_IGNORE_LAYOUT</code> but the object with <code style="color: #bb0000;">LV_OBJ_FLAG_FLOATING</code> will be ignored in <code style="color: #bb0000;">LV_SIZE_CONTENT</code> calculations. |
| + | |||
| + | These flags can be added/removed with <code style="color: #bb0000;">lv_obj_add/clear_flag(obj, FLAG);</code> | ||
| + | | | ||
| + | |} | ||
| + | :[[App:Library:LVGL#Overview|戻る : Previous]] | ||
| − | |||
=== Adding new layouts === | === Adding new layouts === | ||
| + | {| class="wikitable" | ||
| + | !英文 | ||
| + | !自動翻訳 | ||
| + | |- | ||
| + | | | ||
LVGL can be freely extended by a custom layout like this: | LVGL can be freely extended by a custom layout like this: | ||
| + | <syntaxhighlight lang="C++" style="border:1px dashed gray;"> | ||
uint32_t MY_LAYOUT; | uint32_t MY_LAYOUT; | ||
| 290行目: | 454行目: | ||
/*Will be called automatically if it's required to reposition/resize the children of "obj" */ | /*Will be called automatically if it's required to reposition/resize the children of "obj" */ | ||
} | } | ||
| + | </syntaxhighlight> | ||
Custom style properties can be added which can be retrieved and used in the update callback. For example: | Custom style properties can be added which can be retrieved and used in the update callback. For example: | ||
| + | <syntaxhighlight lang="C++" style="border:1px dashed gray;"> | ||
uint32_t MY_PROP; | uint32_t MY_PROP; | ||
... | ... | ||
| 304行目: | 470行目: | ||
lv_style_set_prop(style, LV_STYLE_MY_PROP, v); | lv_style_set_prop(style, LV_STYLE_MY_PROP, v); | ||
} | } | ||
| + | </syntaxhighlight> | ||
| + | | | ||
| + | |} | ||
| + | :[[App:Library:LVGL#Overview|戻る : Previous]] | ||
| + | |||
== Examples == | == Examples == | ||
| 309行目: | 480行目: | ||
| − | |||
| − | |||
| − | |||
| − | |||
:[[App:Library:LVGL#Overview|戻る : Previous]] | :[[App:Library:LVGL#Overview|戻る : Previous]] | ||
2022年6月30日 (木) 20:22時点における版
https://docs.lvgl.io/8.2/overview/coords.html
Positions, sizes, and layouts
Overview
| 英文 | 自動翻訳 |
|---|---|
|
Similarly to many other parts of LVGL, the concept of setting the coordinates was inspired by CSS. LVGL has by no means a complete implementation of CSS but a comparable subset is implemented (sometimes with minor adjustments). In short this means:
|
Units
| 英文 | 自動翻訳 |
|---|---|
|
Boxing model
| 英文 | 自動翻訳 |
|---|---|
|
LVGL follows CSS's border-box model. An object's "box" is built from the following parts:
The outline is drawn outside the bounding box. |
Important notes
| 英文 | 自動翻訳 |
|---|---|
|
This section describes special cases in which LVGL's behavior might be unexpected. |
Postponed coordinate calculation
| 英文 | 自動翻訳 |
|---|---|
|
LVGL doesn't recalculate all the coordinate changes immediately. This is done to improve performance. Instead, the objects are marked as "dirty" and before redrawing the screen LVGL checks if there are any "dirty" objects. If so it refreshes their position, size and layout. In other words, if you need to get the coordinate of an object and the coordinates were just changed, LVGL needs to be forced to recalculate the coordinates. To do this call The size and position might depend on the parent or layout. Therefore |
Removing styles
| 英文 | 自動翻訳 |
|---|---|
|
As it's described in the Using styles section, coordinates can also be set via style properties. To be more precise, under the hood every style coordinate related property is stored as a style property. If you use removed by
lv_obj_remove_style_all(obj)
or lv_obj_remove_style(obj, NULL, LV_PART_MAIN);
the earlier set coordinates will be removed as well. For example: /*The size of obj1 will be set back to the default in the end*/
lv_obj_set_size(obj1, 200, 100); /*Now obj1 has 200;100 size*/
lv_obj_remove_style_all(obj1); /*It removes the set sizes*/
/*obj2 will have 200;100 size in the end */
lv_obj_remove_style_all(obj2);
lv_obj_set_size(obj2, 200, 100);
|
Position
Simple way
| 英文 | 自動翻訳 |
|---|---|
|
To simply set the x and y coordinates of an object use: lv_obj_set_x(obj, 10); //Separate...
lv_obj_set_y(obj, 20);
lv_obj_set_pos(obj, 10, 20); //Or in one function
By default, the x and y coordinates are measured from the top left corner of the parent's content area. For example if the parent has five pixels of padding on every side the above code will place Percentage values are calculated from the parent's content area size. lv_obj_set_x(btn, lv_pct(10)); //x = 10 % of parent content area width
|
Align
| 英文 | 自動翻訳 |
|---|---|
|
In some cases it's convenient to change the origin of the positioning from the default top left. If the origin is changed e.g. to bottom-right, the (0,0) position means: align to the bottom-right corner. To change the origin use: lv_obj_set_align(obj, align);
To change the alignment and set new coordinates: lv_obj_align(obj, align, x, y);
The following alignment options can be used:
It's quite common to align a child to the center of its parent, therefore a dedicated function exists: lv_obj_center(obj);
//Has the same effect
lv_obj_align(obj, LV_ALIGN_CENTER, 0, 0);
If the parent's size changes, the set alignment and position of the children is updated automatically. The functions introduced above align the object to its parent. However, it's also possible to align an object to an arbitrary reference object. lv_obj_align_to(obj_to_align, reference_obj, align, x, y); Besides the alignments options above, the following can be used to align an object outside the reference object:
For example to align a label above a button and center the label horizontally: lv_obj_align_to(label, btn, LV_ALIGN_OUT_TOP_MID, 0, -10);
lv_obj_align(), lv_obj_align_to() can not realign the object if its coordinates or the reference object's coordinates change.
|
Size
Simple way
| 英文 | 自動翻訳 |
|---|---|
|
The width and the height of an object can be set easily as well: lv_obj_set_width(obj, 200); //Separate...
lv_obj_set_height(obj, 100);
lv_obj_set_size(obj, 200, 100); //Or in one function
Percentage values are calculated based on the parent's content area size. For example to set the object's height to the screen height: lv_obj_set_height(obj, lv_pct(100));
The size settings support a special value: Objects with The above functions set the size of an object's bounding box but the size of the content area can be set as well. This means an object's bounding box will be enlarged with the addition of padding. lv_obj_set_content_width(obj, 50); //The actual width: padding left + 50 + padding right
lv_obj_set_content_height(obj, 30); //The actual width: padding top + 30 + padding bottom
The size of the bounding box and the content area can be retrieved with the following functions: lv_coord_t w = lv_obj_get_width(obj);
lv_coord_t h = lv_obj_get_height(obj);
lv_coord_t content_w = lv_obj_get_content_width(obj);
lv_coord_t content_h = lv_obj_get_content_height(obj);
|
Using styles
| 英文 | 自動翻訳 |
|---|---|
|
Under the hood the position, size and alignment properties are style properties. The above described "simple functions" hide the style related code for the sake of simplicity and set the position, size, and alignment properties in the local styles of the object. However, using styles to set the coordinates has some great advantages:
Here are some examples to set an object's size using a style: static lv_style_t style;
lv_style_init(&style);
lv_style_set_width(&style, 100);
lv_obj_t * btn = lv_btn_create(lv_scr_act());
lv_obj_add_style(btn, &style, LV_PART_MAIN);
As you will see below there are some other great features of size and position setting. However, to keep the LVGL API lean, only the most common coordinate setting features have a "simple" version and the more complex features can be used via styles. |
Translation
| 英文 | 自動翻訳 |
|---|---|
|
Let's say the there are 3 buttons next to each other. Their position is set as described above. Now you want to move a button up a little when it's pressed. One way to achieve this is by setting a new Y coordinate for the pressed state: static lv_style_t style_normal;
lv_style_init(&style_normal);
lv_style_set_y(&style_normal, 100);
static lv_style_t style_pressed;
lv_style_init(&style_pressed);
lv_style_set_y(&style_pressed, 80);
lv_obj_add_style(btn1, &style_normal, LV_STATE_DEFAULT);
lv_obj_add_style(btn1, &style_pressed, LV_STATE_PRESSED);
lv_obj_add_style(btn2, &style_normal, LV_STATE_DEFAULT);
lv_obj_add_style(btn2, &style_pressed, LV_STATE_PRESSED);
lv_obj_add_style(btn3, &style_normal, LV_STATE_DEFAULT);
lv_obj_add_style(btn3, &style_pressed, LV_STATE_PRESSED);
This works, but it's not really flexible because the pressed coordinate is hard-coded. If the buttons are not at y=100, static lv_style_t style_normal;
lv_style_init(&style_normal);
lv_style_set_y(&style_normal, 100);
static lv_style_t style_pressed;
lv_style_init(&style_pressed);
lv_style_set_translate_y(&style_pressed, -20);
lv_obj_add_style(btn1, &style_normal, LV_STATE_DEFAULT);
lv_obj_add_style(btn1, &style_pressed, LV_STATE_PRESSED);
lv_obj_add_style(btn2, &style_normal, LV_STATE_DEFAULT);
lv_obj_add_style(btn2, &style_pressed, LV_STATE_PRESSED);
lv_obj_add_style(btn3, &style_normal, LV_STATE_DEFAULT);
lv_obj_add_style(btn3, &style_pressed, LV_STATE_PRESSED);
Translation is applied from the current position of the object. Percentage values can be used in translations as well. The percentage is relative to the size of the object (and not to the size of the parent). For example The translation is applied after the layouts are calculated. Therefore, even laid out objects' position can be translated. The translation actually moves the object. That means it makes the scrollbars and TransformationSimilarly to position, an object's size can be changed relative to the current size as well. The transformed width and height are added on both sides of the object. This means a 10 px transformed width makes the object 2x10 pixels wider. Unlike position translation, the size transformation doesn't make the object "really" larger. In other words scrollbars, layouts, and This code enlarges a button when it's pressed: static lv_style_t style_pressed;
lv_style_init(&style_pressed);
lv_style_set_transform_width(&style_pressed, 10);
lv_style_set_transform_height(&style_pressed, 10);
lv_obj_add_style(btn, &style_pressed, LV_STATE_PRESSED);
|
Min and Max size
| 英文 | 自動翻訳 |
|---|---|
|
Similarly to CSS, LVGL also supports static lv_style_t style_max_height;
lv_style_init(&style_max_height);
lv_style_set_y(&style_max_height, 200);
lv_obj_set_height(obj, lv_pct(100));
lv_obj_add_style(obj, &style_max_height, LV_STATE_DEFAULT); //Limit the height to 200 px
Percentage values can be used as well which are relative to the size of the parent's content area. static lv_style_t style_max_height;
lv_style_init(&style_max_height);
lv_style_set_y(&style_max_height, lv_pct(50));
lv_obj_set_height(obj, lv_pct(100));
lv_obj_add_style(obj, &style_max_height, LV_STATE_DEFAULT); //Limit the height to half parent height
|
Layout
Overview
| 英文 | 自動翻訳 |
|---|---|
|
Layouts can update the position and size of an object's children. They can be used to automatically arrange the children into a line or column, or in much more complicated forms. The position and size set by the layout overwrites the "normal" x, y, width, and height settings. There is only one function that is the same for every layout: |
Built-in layout
| 英文 | 自動翻訳 |
|---|---|
|
LVGL comes with two very powerful layouts:
Both are heavily inspired by the CSS layouts with the same name. |
Flags
| 英文 | 自動翻訳 |
|---|---|
|
There are some flags that can be used on objects to affect how they behave with layouts:
These flags can be added/removed with |
Adding new layouts
| 英文 | 自動翻訳 |
|---|---|
|
LVGL can be freely extended by a custom layout like this: uint32_t MY_LAYOUT;
...
MY_LAYOUT = lv_layout_register(my_layout_update, &user_data);
...
void my_layout_update(lv_obj_t * obj, void * user_data)
{
/*Will be called automatically if it's required to reposition/resize the children of "obj" */
}
Custom style properties can be added which can be retrieved and used in the update callback. For example: uint32_t MY_PROP;
...
LV_STYLE_MY_PROP = lv_style_register_prop();
...
static inline void lv_style_set_my_prop(lv_style_t * style, uint32_t value)
{
lv_style_value_t v = {
.num = (int32_t)value
};
lv_style_set_prop(style, LV_STYLE_MY_PROP, v);
}
|