「App:Library:LVGL:docs:Overview:Layers」の版間の差分
| (同じ利用者による、間の4版が非表示) | |||
| 1行目: | 1行目: | ||
https://docs.lvgl.io/8.2/overview/layer.html | https://docs.lvgl.io/8.2/overview/layer.html | ||
__NOTOC__ | __NOTOC__ | ||
| + | = Layers = | ||
| + | == Order of creation == | ||
{| class="wikitable" | {| class="wikitable" | ||
!英文 | !英文 | ||
| 6行目: | 8行目: | ||
|- | |- | ||
| | | | ||
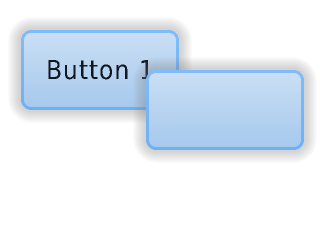
| − | | | + | By default, LVGL draws new objects on top of old objects. |
| − | | | + | |
| + | |||
| + | For example, assume we add a button to a parent object named button1 and then another button named button2. | ||
| + | |||
| + | |||
| + | Then button1 (along with its child object(s)) will be in the background and can be covered by button2 and its children. | ||
| + | [[file:LVGL docs overview Layers 01.png|link=https://docs.lvgl.io/8.2/overview/layer.html#order-of-creation]] | ||
| + | <syntaxhighlight lang="C++" style="border:1px dashed gray;"> | ||
| + | /*Create a screen*/ | ||
| + | lv_obj_t * scr = lv_obj_create(NULL, NULL); | ||
| + | lv_scr_load(scr); /*Load the screen*/ | ||
| + | |||
| + | /*Create 2 buttons*/ | ||
| + | lv_obj_t * btn1 = lv_btn_create(scr, NULL); /*Create a button on the screen*/ | ||
| + | lv_btn_set_fit(btn1, true, true); /*Enable automatically setting the size according to content*/ | ||
| + | lv_obj_set_pos(btn1, 60, 40); /*Set the position of the button*/ | ||
| + | |||
| + | lv_obj_t * btn2 = lv_btn_create(scr, btn1); /*Copy the first button*/ | ||
| + | lv_obj_set_pos(btn2, 180, 80); /*Set the position of the button*/ | ||
| + | |||
| + | /*Add labels to the buttons*/ | ||
| + | lv_obj_t * label1 = lv_label_create(btn1, NULL); /*Create a label on the first button*/ | ||
| + | lv_label_set_text(label1, "Button 1"); /*Set the text of the label*/ | ||
| + | |||
| + | lv_obj_t * label2 = lv_label_create(btn2, NULL); /*Create a label on the second button*/ | ||
| + | lv_label_set_text(label2, "Button 2"); /*Set the text of the label*/ | ||
| + | |||
| + | /*Delete the second label*/ | ||
| + | lv_obj_del(label2); | ||
| + | </syntaxhighlight> | ||
| + | |デフォルトでは、LVGLは古いオブジェクトの上に新しいオブジェクトを描画します。 | ||
| + | |||
| + | 例えば、button1という名前の親オブジェクトにボタンを追加し、さらにbutton2という名前の別のボタンを追加したとします。 | ||
| + | |||
| + | すると、button1(とその子オブジェクト)は背景になり、button2とその子オブジェクトに覆われる可能性があります。 | ||
| + | |||
| + | (絵) | ||
| + | |||
| + | |||
| + | |||
| + | |||
| + | |||
| + | |||
| − | |||
| − | |||
| − | |||
| − | |||
| − | |||
| + | <syntaxhighlight lang="C++" style="border:1px dashed gray;"> | ||
/*Create a screen*/ | /*Create a screen*/ | ||
lv_obj_t * scr = lv_obj_create(NULL, NULL); | lv_obj_t * scr = lv_obj_create(NULL, NULL); | ||
| 40行目: | 80行目: | ||
/*Delete the second label*/ | /*Delete the second label*/ | ||
lv_obj_del(label2); | lv_obj_del(label2); | ||
| + | </syntaxhighlight> | ||
| + | |} | ||
| + | :[[App:Library:LVGL:docs:Overview#Layers|戻る : Previous]] | ||
| + | |||
== Bring to the foreground == | == Bring to the foreground == | ||
| + | {| class="wikitable" | ||
| + | !英文 | ||
| + | !自動翻訳 | ||
| + | |- | ||
| + | | | ||
There are four explicit ways to bring an object to the foreground: | There are four explicit ways to bring an object to the foreground: | ||
| − | * Use <code>lv_obj_move_foreground(obj)</code> to bring an object to the foreground. Similarly, use <code>lv_obj_move_background(obj)</code> to move it to the background. | + | * Use <code style="color: #bb0000;">lv_obj_move_foreground(obj)</code> to bring an object to the foreground. Similarly, use <code style="color: #bb0000;">lv_obj_move_background(obj)</code> to move it to the background. |
| − | * Use <code>lv_obj_move_up(obj)</code> to move an object one position up in the hierarchy, Similarly, use <code>lv_obj_move_down(obj)</code> to move an object one position down in the hierarchy. | + | * Use <code style="color: #bb0000;">lv_obj_move_up(obj)</code> to move an object one position up in the hierarchy, Similarly, use <code style="color: #bb0000;">lv_obj_move_down(obj)</code> to move an object one position down in the hierarchy. |
| − | * Use <code>lv_obj_swap(obj1, obj2)</code> to swap the relative layer position of two objects. | + | * Use <code style="color: #bb0000;">lv_obj_swap(obj1, obj2)</code> to swap the relative layer position of two objects. |
| − | * When <code>lv_obj_set_parent(obj, new_parent)</code> is used, <code>obj</code> will be on the foreground of the <code>new_parent</code>. | + | * When <code style="color: #bb0000;">lv_obj_set_parent(obj, new_parent)</code> is used, <code style="color: #bb0000;">obj</code> will be on the foreground of the <code style="color: #bb0000;">new_parent</code>. |
| + | |オブジェクトを前面に出すには、4つの明示的な方法があります。 | ||
| + | |||
| + | * オブジェクトを前景に移動させるには、 <code style="color: #bb0000;">lv_obj_move_foreground(obj)</code> を使います。同様に、<code style="color: #bb0000;">lv_obj_move_background(obj)</code> を使って、背景へ移動させます。 | ||
| + | * オブジェクトを1つ上の階層に移動するには、<code style="color: #bb0000;">lv_obj_move_up(obj)</code> を使用します。 同様に、オブジェクトを階層内で1つ下に移動させるには<code style="color: #bb0000;">lv_obj_move_down(obj)</code> を使用します。 | ||
| + | *<code style="color: #bb0000;">lv_obj_swap(obj1, obj2)</code> は、2つのオブジェクトの相対的なレイヤーの位置を入れ替えるために使用します。 | ||
| + | *<code style="color: #bb0000;">lv_obj_set_parent(obj, new_parent)</code> が使われると、 <code style="color: #bb0000;">obj</code> は <code style="color: #bb0000;">new_parent</code>の前景に置かれます。 | ||
| + | |} | ||
| + | :[[App:Library:LVGL:docs:Overview#Layers|戻る : Previous]] | ||
| + | |||
== Top and sys layers == | == Top and sys layers == | ||
| − | LVGL uses two special layers named <code>layer_top</code> and <code>layer_sys</code>. Both are visible and common on all screens of a display. They are not, however, shared among multiple physical displays. The <code>layer_top</code> is always on top of the default screen (<code>lv_scr_act()</code>), and <code>layer_sys</code> is on top of <code>layer_top</code>. | + | {| class="wikitable" |
| + | !英文 | ||
| + | !自動翻訳 | ||
| + | |- | ||
| + | | | ||
| + | LVGL uses two special layers named <code style="color: #bb0000;">layer_top</code> and <code style="color: #bb0000;">layer_sys</code>. | ||
| + | |||
| + | Both are visible and common on all screens of a display. | ||
| + | |||
| + | |||
| + | They are not, however, shared among multiple physical displays. | ||
| + | |||
| + | The <code style="color: #bb0000;">layer_top</code> is always on top of the default screen (<code style="color: #bb0000;">lv_scr_act()</code>), and <code style="color: #bb0000;">layer_sys</code> is on top of <code style="color: #bb0000;">layer_top</code>. | ||
| + | |||
| − | The <code>layer_top</code> can be used by the user to create some content visible everywhere. For example, a menu bar, a pop-up, etc. If the <code>click</code> attribute is enabled, then <code>layer_top</code> will absorb all user clicks and acts as a modal. | + | The <code style="color: #bb0000;">layer_top</code> can be used by the user to create some content visible everywhere. |
| + | |||
| + | For example, a menu bar, a pop-up, etc. | ||
| + | |||
| + | If the <code style="color: #bb0000;">click</code> attribute is enabled, then <code style="color: #bb0000;">layer_top</code> will absorb all user clicks and acts as a modal. | ||
| + | <syntaxhighlight lang="C++" style="border:1px dashed gray;"> | ||
lv_obj_add_flag(lv_layer_top(), LV_OBJ_FLAG_CLICKABLE); | lv_obj_add_flag(lv_layer_top(), LV_OBJ_FLAG_CLICKABLE); | ||
| − | The <code>layer_sys</code> is also used for similar purposes in LVGL | + | </syntaxhighlight> |
| + | The <code style="color: #bb0000;">layer_sys</code> is also used for similar purposes in LVGL. | ||
| + | For example, it places the mouse cursor above all layers to be sure it's always visible. | ||
| + | |LVGLは<code style="color: #bb0000;">layer_top</code> と <code style="color: #bb0000;">layer_sys</code> という2つの特別なレイヤーを使用します。 | ||
| + | |||
| + | どちらもディスプレイの全画面で見ることができます。 | ||
| + | |||
| + | |||
| + | しかし、これらは複数の物理ディスプレイ間で共有されることはない。 | ||
| + | |||
| + | <code style="color: #bb0000;">layer_top</code> は常にデフォルト画面 (<code style="color: #bb0000;">lv_scr_act()</code>)の上にあり、 <code style="color: #bb0000;">layer_sys</code>は<code style="color: #bb0000;">layer_top</code>の上にある。 | ||
| + | |||
| + | |||
| + | The <code style="color: #bb0000;">layer_top</code> は、ユーザーがどこでも見えるいくつかのコンテンツを作成するために使用することができます。 | ||
| + | |||
| + | たとえば、メニューバー、ポップアップなどです。 | ||
| + | |||
| + | <code style="color: #bb0000;">click</code>属性が有効な場合、<code style="color: #bb0000;">layer_top</code> はユーザーのクリックをすべて吸収し、モーダルとして動作します。 | ||
| + | <syntaxhighlight lang="C++" style="border:1px dashed gray;"> | ||
| + | lv_obj_add_flag(lv_layer_top(), LV_OBJ_FLAG_CLICKABLE); | ||
| + | </syntaxhighlight> | ||
| + | <code style="color: #bb0000;">layer_sys</code>は LVGL でも同様の目的で使用されます。 | ||
| + | |||
| + | 例えば、マウスカーソルが常に見えるように、すべてのレイヤーの上に配置されます。 | ||
| + | |} | ||
| − | + | [[App:Library:LVGL#Overview|戻る : Previous]] | |
2022年7月2日 (土) 10:15時点における最新版
https://docs.lvgl.io/8.2/overview/layer.html
Layers
Order of creation
| 英文 | 自動翻訳 |
|---|---|
|
By default, LVGL draws new objects on top of old objects.
 /*Create a screen*/
 lv_obj_t * scr = lv_obj_create(NULL, NULL);
 lv_scr_load(scr);          /*Load the screen*/

 /*Create 2 buttons*/
 lv_obj_t * btn1 = lv_btn_create(scr, NULL);         /*Create a button on the screen*/
 lv_btn_set_fit(btn1, true, true);                   /*Enable automatically setting the size according to content*/
 lv_obj_set_pos(btn1, 60, 40);              	   /*Set the position of the button*/

 lv_obj_t * btn2 = lv_btn_create(scr, btn1);         /*Copy the first button*/
 lv_obj_set_pos(btn2, 180, 80);                    /*Set the position of the button*/

 /*Add labels to the buttons*/
 lv_obj_t * label1 = lv_label_create(btn1, NULL);	/*Create a label on the first button*/
 lv_label_set_text(label1, "Button 1");          	/*Set the text of the label*/

 lv_obj_t * label2 = lv_label_create(btn2, NULL);  	/*Create a label on the second button*/
 lv_label_set_text(label2, "Button 2");            	/*Set the text of the label*/

 /*Delete the second label*/
 lv_obj_del(label2);
|
デフォルトでは、LVGLは古いオブジェクトの上に新しいオブジェクトを描画します。
例えば、button1という名前の親オブジェクトにボタンを追加し、さらにbutton2という名前の別のボタンを追加したとします。 すると、button1(とその子オブジェクト)は背景になり、button2とその子オブジェクトに覆われる可能性があります。 (絵)
 /*Create a screen*/
 lv_obj_t * scr = lv_obj_create(NULL, NULL);
 lv_scr_load(scr);          /*Load the screen*/

 /*Create 2 buttons*/
 lv_obj_t * btn1 = lv_btn_create(scr, NULL);         /*Create a button on the screen*/
 lv_btn_set_fit(btn1, true, true);                   /*Enable automatically setting the size according to content*/
 lv_obj_set_pos(btn1, 60, 40);              	   /*Set the position of the button*/

 lv_obj_t * btn2 = lv_btn_create(scr, btn1);         /*Copy the first button*/
 lv_obj_set_pos(btn2, 180, 80);                    /*Set the position of the button*/

 /*Add labels to the buttons*/
 lv_obj_t * label1 = lv_label_create(btn1, NULL);	/*Create a label on the first button*/
 lv_label_set_text(label1, "Button 1");          	/*Set the text of the label*/

 lv_obj_t * label2 = lv_label_create(btn2, NULL);  	/*Create a label on the second button*/
 lv_label_set_text(label2, "Button 2");            	/*Set the text of the label*/

 /*Delete the second label*/
 lv_obj_del(label2);
|
Bring to the foreground
| 英文 | 自動翻訳 |
|---|---|
|
There are four explicit ways to bring an object to the foreground:
|
オブジェクトを前面に出すには、4つの明示的な方法があります。
|
Top and sys layers
| 英文 | 自動翻訳 |
|---|---|
|
LVGL uses two special layers named Both are visible and common on all screens of a display.
The
For example, a menu bar, a pop-up, etc. If the lv_obj_add_flag(lv_layer_top(), LV_OBJ_FLAG_CLICKABLE);
The For example, it places the mouse cursor above all layers to be sure it's always visible. |
LVGLはlayer_top と layer_sys という2つの特別なレイヤーを使用します。
どちらもディスプレイの全画面で見ることができます。
たとえば、メニューバー、ポップアップなどです。
lv_obj_add_flag(lv_layer_top(), LV_OBJ_FLAG_CLICKABLE);
例えば、マウスカーソルが常に見えるように、すべてのレイヤーの上に配置されます。 |