「App:IDE:Visual Studio Code」の版間の差分
(→動作確認) |
|||
| (同じ利用者による、間の12版が非表示) | |||
| 17行目: | 17行目: | ||
|- | |- | ||
|ESP-IDF をインストール (Espressif IoT Development Framework) | |ESP-IDF をインストール (Espressif IoT Development Framework) | ||
| − | |[[ | + | |[[file:VSCode ESP-IDF install.jpg|350px]] |
|CPUモジュールのメーカーであるEspressifの | |CPUモジュールのメーカーであるEspressifの | ||
| 25行目: | 25行目: | ||
|- | |- | ||
|PlatformIO をインストール | |PlatformIO をインストール | ||
| − | |[[ | + | |[[file:VSCode PlatformIO install.jpg|350px]] |
|PlatformIOはプロジェクトを作るのに必要なため | |PlatformIOはプロジェクトを作るのに必要なため | ||
| 38行目: | 38行目: | ||
|- | |- | ||
|Japanese Language Pack をインストール | |Japanese Language Pack をインストール | ||
| − | |[[ | + | |[[file:VSCode japanese install.jpg|350px]] |
|VSCodeを日本語表示にする場合にインストール | |VSCodeを日本語表示にする場合にインストール | ||
| 49行目: | 49行目: | ||
|- | |- | ||
|Arduino for Visual Studio Code をインストール | |Arduino for Visual Studio Code をインストール | ||
| − | |[[ | + | |[[file:VSCode Aduino install.jpg|350px]] |
|Arduino スケッチの開発~デバッグのための機能一式。 | |Arduino スケッチの開発~デバッグのための機能一式。 | ||
| 59行目: | 59行目: | ||
</blockquote> | </blockquote> | ||
| − | === ''' | + | === '''設定 1/2 : 全般''' === |
<blockquote> | <blockquote> | ||
{| class="wikitable" | {| class="wikitable" | ||
|- | |- | ||
|Arduino Path | |Arduino Path | ||
| − | |[[ | + | |[[file:VSCode Set-1.jpg|350px]] |
| − | [[ | + | [[file:VSCode Set-2.jpg|350px]] |
|"C:\Program Files (x86)\Arduino" | |"C:\Program Files (x86)\Arduino" | ||
|- | |- | ||
|Intelli sense engine | |Intelli sense engine | ||
| − | |[[ | + | |[[file:VSCode Set-3.jpg|350px]] |
|Tag Perserに設定 | |Tag Perserに設定 | ||
|- | |- | ||
|文字化け対策 | |文字化け対策 | ||
| | | | ||
| − | [[ | + | [[file:Utils-js.jpg|350px]] |
| 89行目: | 89行目: | ||
| − | [[ | + | [[file:Utils.js-2.jpg|350px]] |
| 106行目: | 106行目: | ||
</blockquote> | </blockquote> | ||
| − | === ''' | + | === '''設定 2/2 : PlatdormIO''' === |
<blockquote> | <blockquote> | ||
{| class="wikitable" | {| class="wikitable" | ||
|- | |- | ||
|PlatformIO Homeをクリック | |PlatformIO Homeをクリック | ||
| − | |[[ | + | |[[file:VSCode NewPRJ-1.jpg|350px]] |
|PlatformIOをインストール済であればウィンドウ下部に家のマーク | |PlatformIOをインストール済であればウィンドウ下部に家のマーク | ||
| 117行目: | 117行目: | ||
|- | |- | ||
|"+New Project"をクリック | |"+New Project"をクリック | ||
| − | |[[ | + | |[[file:VSCode NewPRJ-2.jpg|350px]] |
| | | | ||
|- | |- | ||
|Projectの設定を記入 | |Projectの設定を記入 | ||
| − | |[[ | + | |[[file:VSCode NewPRJ-3.jpg|350px]] |
|Name :プロジェクト名 | |Name :プロジェクト名 | ||
| 135行目: | 135行目: | ||
"monitor_speed = 115200" | "monitor_speed = 115200" | ||
| − | |[[ | + | |[[file:VSCode NewPRJ-4.jpg|350px]] |
|"platformio.ini"に記入するデバッグモニタとしての通信速度と | |"platformio.ini"に記入するデバッグモニタとしての通信速度と | ||
| 152行目: | 152行目: | ||
|- | |- | ||
|プログラムを記入し、Upload | |プログラムを記入し、Upload | ||
| − | |[[ | + | |[[file:VSCode NewPRJ-5.jpg|350px]] |
|#include <Arduino.h> | |#include <Arduino.h> | ||
int i; | int i; | ||
| 182行目: | 182行目: | ||
おまじない的に常に先頭に"'''#include <Arduino.h>'''"を追加しておけば無難です。 | おまじない的に常に先頭に"'''#include <Arduino.h>'''"を追加しておけば無難です。 | ||
| − | + | ||
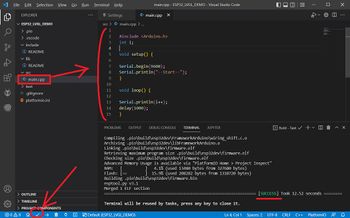
| + | "main.cpp"の中身を書き換えて、画面下にある"✓"をクリックするとコンパイルまで実行します。 | ||
| + | |||
| + | 右下の画面内に [SUCCESS] と表示されたら完了です。 | ||
| + | |||
{| class="wikitable" | {| class="wikitable" | ||
| − | |[[ | + | |[[file:VSCode NewPRJ-6.jpg|350px]] |
|'''#include <Arduino.h>''' | |'''#include <Arduino.h>''' | ||
int i; | int i; | ||
| 210行目: | 214行目: | ||
</blockquote> | </blockquote> | ||
| − | + | == 参考 == | |
| + | <blockquote> | ||
| + | https://randomnerdtutorials.com/vs-code-platformio-ide-esp32-esp8266-arduino/</blockquote> | ||
----[https://robot-jp.com/wiki/index.php 戻る] | ----[https://robot-jp.com/wiki/index.php 戻る] | ||
2022年10月5日 (水) 22:43時点における最新版
Arduino IDEをインストール
※Arduino IDEの機能を使うためインストール済である必要があります。
VSCodeをダウンロード&インストール (Windows10)
ダウンロード
https://azure.microsoft.com/ja-jp/products/visual-studio-code/
インストール
ESP-IDF をインストール (Espressif IoT Development Framework) 
CPUモジュールのメーカーであるEspressifの フレームワークは使用頻度が高いため、
インストールしておきます。
PlatformIO をインストール 
PlatformIOはプロジェクトを作るのに必要なため インストールしておきます。
PlatformIOをインストールするとウィンドウ下部に家のマークのアイコンができ、そこをクリック
するとプロジェクトを作れるようになります。
Japanese Language Pack をインストール 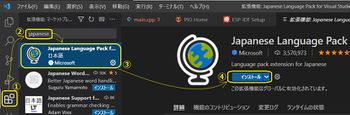
VSCodeを日本語表示にする場合にインストール します。
英語のままでよければインストールする必要はありません。
Arduino for Visual Studio Code をインストール 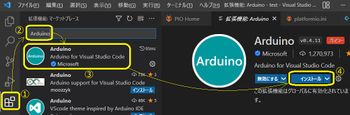
Arduino スケッチの開発~デバッグのための機能一式。
インストールする前に、Arduino IDEまたはArduino CLIのいずれかがインストール済である必要があります。


設定 1/2 : 全般
Arduino Path 
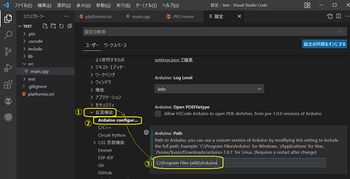
"C:\Program Files (x86)\Arduino" Intelli sense engine 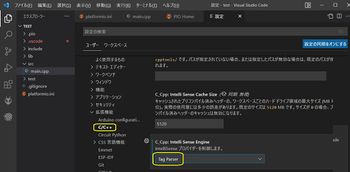
Tag Perserに設定 文字化け対策
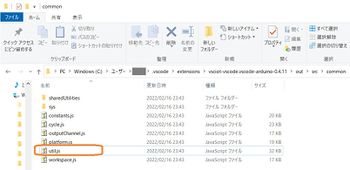
VSCoreが起動したままの状態で
C:\Users\(ユーザー名)\.vscode\extensions\vsciot-vscode.vscode-arduino-0.4.11\out\src\common\util.js
をダブルクリックしてVSCoreで開く。
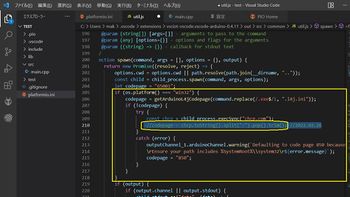
210行目辺りの次の部分をコメントアウトする。//codepage = chcp.toString().split(":").pop().trim();
これで解決するはずだけど、ダメなら205~218行の範囲を全てコメントアウトする。
終わったらCTRL+Sで保存する。参考HP1:1行だけコメントアウト


設定 2/2 : PlatdormIO
PlatformIO Homeをクリック 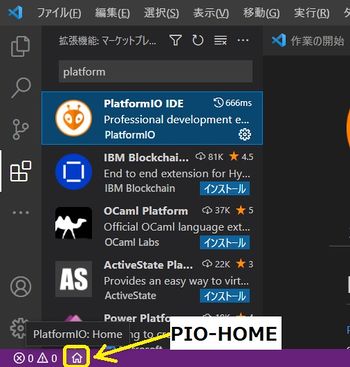
PlatformIOをインストール済であればウィンドウ下部に家のマーク のボタンができるので、そこをクリックします。
"+New Project"をクリック 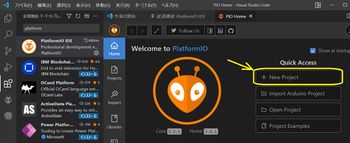
Projectの設定を記入 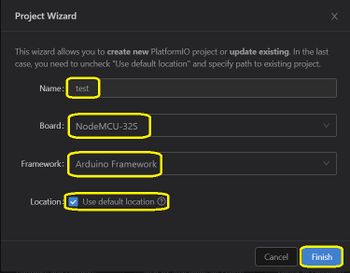
Name :プロジェクト名 Board :DevBoard名(NodeMCU-32S / ESP32 Dev Module)
Framework :Arduino Framework
Location :[✓]Use default location
platformio.iniにデバッグコンソールの 通信速度を追記
"monitor_speed = 115200"
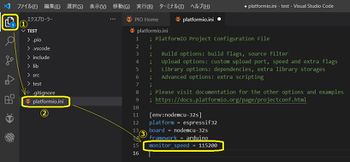
"platformio.ini"に記入するデバッグモニタとしての通信速度と プログラム内で指定するシリアル通信速度を同じ値に合わせておくと、
書き込み直後からのシリアル受信データをデバッグウィンドウ内で
確認できます。
フォルダ一覧(EXPLORER)が出てない時に表示する方法:CTRL+SHIFT+E
又は、"表示(View)"→"Explorer"
プログラムを記入し、Upload 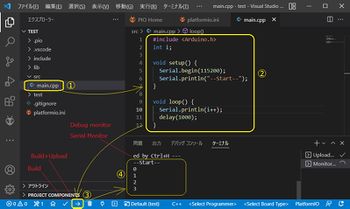
#include <Arduino.h> int i;
void setup() {
Serial.begin(9600);
Serial.println("--Start--");
}
void loop() {
Serial.println(i++);
delay(1000);
}


動作確認
簡単なプログラムで試しに動作確認をします。
VSCodeは汎用のEditorであるため、Arduino言語を使うためには追加のヘッダを取り込む必要があります。
おまじない的に常に先頭に"#include <Arduino.h>"を追加しておけば無難です。
"main.cpp"の中身を書き換えて、画面下にある"✓"をクリックするとコンパイルまで実行します。右下の画面内に [SUCCESS] と表示されたら完了です。
#include <Arduino.h> int i;
void setup() {
- Serial.begin(9600);
- Serial.println("--Start--");
}
void loop() {
- Serial.println(i++);
- delay(1000);
}

補足
設定やライブラリはArduino IDEの設定が引き継がれます。(VSCode上でもライブラリの追加は可能)
チュートリアル
参考
https://randomnerdtutorials.com/vs-code-platformio-ide-esp32-esp8266-arduino/